Rice Krispie Candy Corn Treats
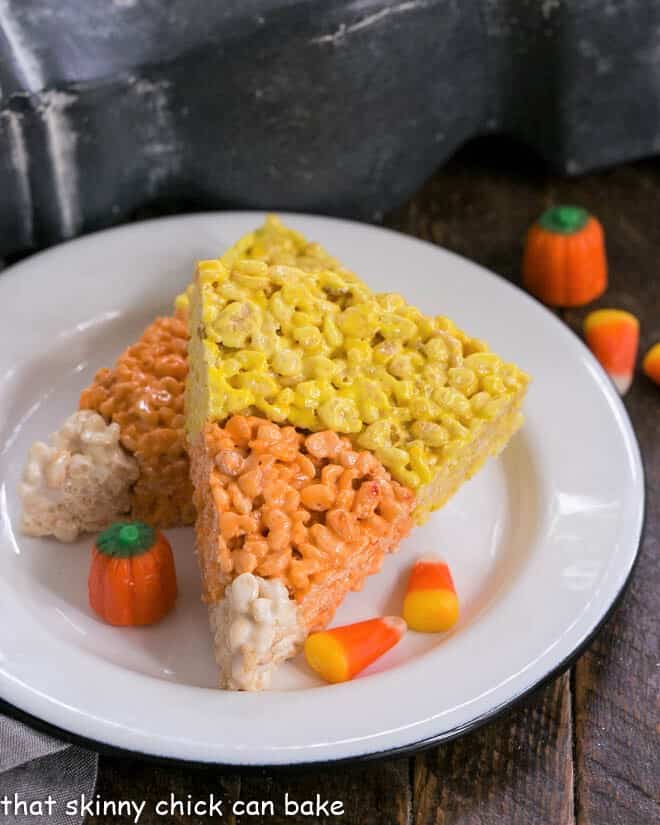
Rice Krispie Candy Corn Treats are a fun Halloween Treat that your kids and their friends will go nuts for! Be prepared for rave reviews!!! This easy recipe creates the ultimate Halloween Dessert that brings back memories of a childhood favorite cereal treat.
This Rice Krispie Squares Recipe is a fun twist on the basic Rice Krispie treats. With minimal ingredients, these are a simple dessert for Halloween that the whole family will love!
Why You Must Make
- These Halloween Treats are just as yummy as the classic version of cereal bars. I find them addictive!
- No baking is required to make this Halloween Party Food!
- Rice Krispie treats are beloved by all ages—from toddlers to adults.
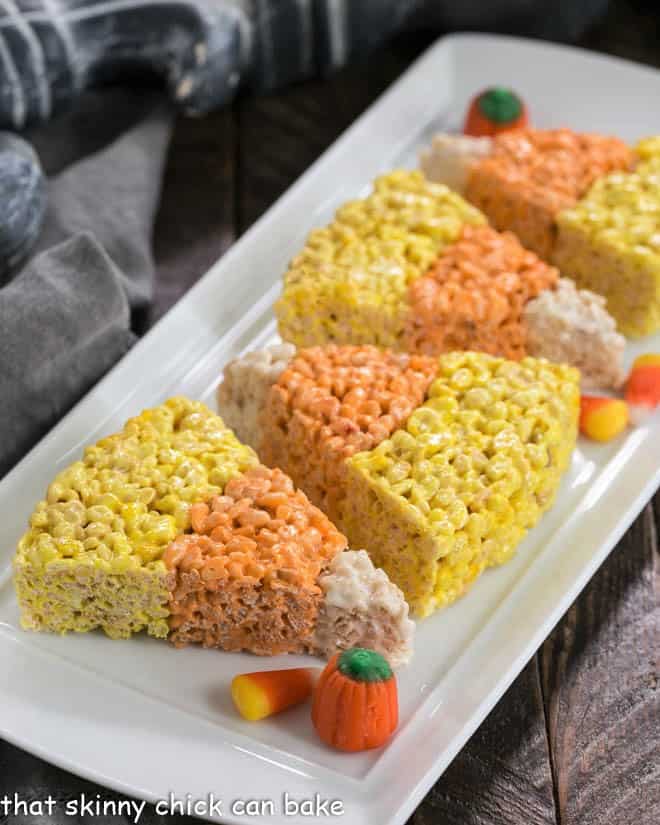
OK, you do not need to adjust your monitors. I just need a little food dye 101 intervention. The colors aren’t exactly spot on with these tri-colored candy corn-inspired Rice Krispie Treats, but they are close enough, I hope, for recognition.
These festive gems made their way to Indiana University as part of a college care package for my youngest, Nick. Along with some brownie cookies studded with M&M’s, I think he and his roomies were set with sweets for a couple of nights. We also treated him and 4 of his friends to dinner at a steak house. Man, can those boys can eat and they LOVED these Halloween Rice Krispie Treats!
Ingredient Notes
- Rice Krispies Cereal – You will need almost 5 cups
- Mini Marshmallows – You will need at least 5 cups
- Butter – Salted is preferred as salt enhances the flavor of even sweet recipes.
- Yellow and Orange Gel Food Coloring – Gel coloring is preferred over liquid food coloring for the deepest colors.
Recipe Tips
If you’ve never made a Rice Krispie Treats Recipe before, they’re a super easy, 3 ingredient recipe. Adding food coloring adds a fourth component. The ingredients you need are Rice Krispies, butter, and marshmallows.
- Make sure to measure properly. It’s better to have a few extra marshmallows than not enough. Make sure to use soft, fresh marshmallows for the best results. Mini marshmallows will melt more easily.
- PRO-Tip: When you melt together the marshmallows and butter, do it very gently. I use short bursts in the microwave, stopping and stirring frequently. If you overheat this mixture, your Rice Krispie Treats will be hard when cool. Alternatively, melt the marshmallows and butter in a saucepan over low heat, stirring frequently as they begin melting.
- If you’re unsure how old your box of Rice Krispies cereal is, it’s best to buy a new one. Stale cereal doesn’t make very good Krispie treats.
- Use a light hand when mixing in the cereal, making sure all the cereal is coated. I like using a silicone spatula.
- PRO-Tip: Make sure your pan is well-greased. Also, have butter available to grease your hands. The mixture sticks to everything!
- If you’re using any rings or bowls to help make these Candy Corn Rice Krispie Treats, grease those well, too.
- Normally, you don’t want to press the Rice Krispies mixture down with a firm hand. Compressing the Rice Krispie Treats won’t give you the desired light, gooey consistency. But, in this recipe, you can use a little extra pressure, so that the layers don’t have big gaps.
- Store your Rice Krispie Treats in a sealed, air-tight container. They’re fine kept at room temperature, but if you refrigerate them, let them come to room temperature before eating or they will be hard to bite into. They make such easy Halloween treats.
How to Make
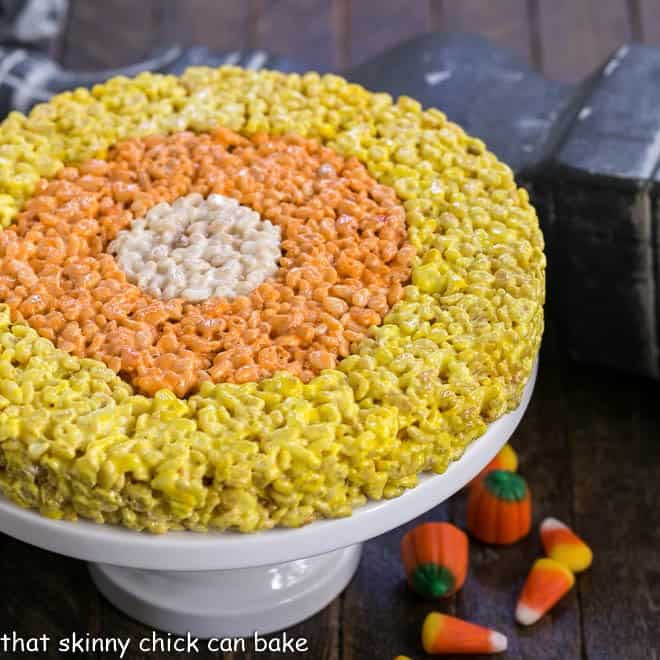
These Candy Corn Rice Krispie Treats are made in an (affiliate link) 8-inch round cake pan.
- First, a batch of yellow Rice Krispie treats is made and pressed into a 1½-inch ring around the perimeter of the pan.
- This is followed by a slightly smaller orange batch pressed in right next to the orange in another 1½-inch diameter ring.
- This leaves a 2-inch round center space for the smallest batch of uncolored RKT.
Recipe Tips
- Make sure your pan is well greased and the round will pop right out when cooled. I simply slice the treats into 6-8 equal wedges, and voila! They look like candy corn.
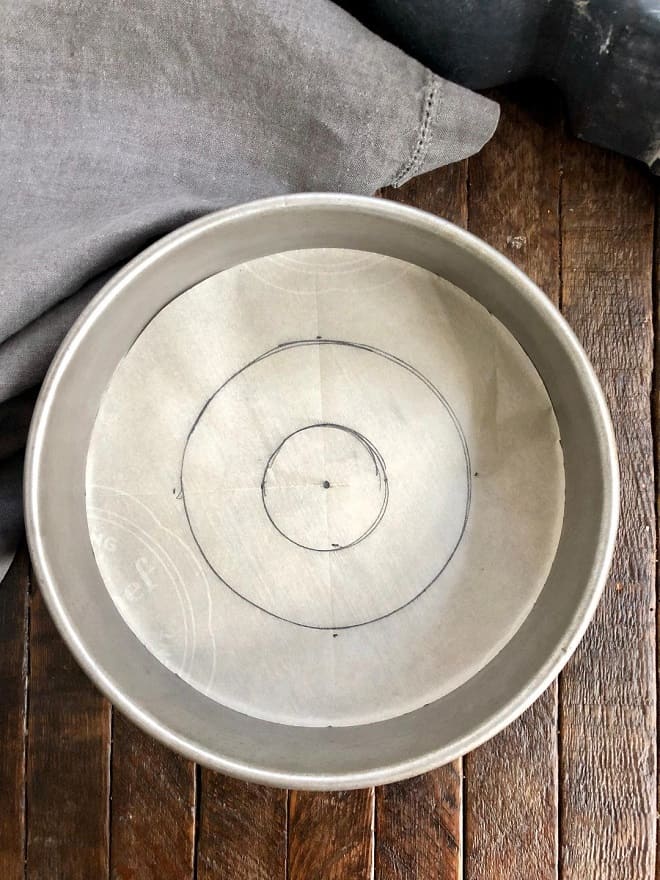
- PRO-Tip: I like using a round of parchment with the sections marked off in the bottom of the greased cake pan. Turn the marked side down, so your RKTs will be pressed onto the clean side of the parchment.
- The lines are guidance for where the sections should start and stop. Another tip is to use an appropriately sized, greased cookie cutter and/or small mixing bowl to provide a division for the layers. Hold the cookie cutter or bowl in the center of the pan, and pack the RKT mixture into the desired area.
- Use a flat bottom spatula to press down evenly across the surface of the Krispie treats. Do your best to keep them level.
Frequently Asked Questions
First, make sure all your ingredients are fresh, especially the Rice Krispies and marshmallows. Adding a touch of vanilla will also enhance their flavor beautifully. Don’t over mix or the cereal will break into pieces and also don’t compress them too much when pressing the mixture into the pan. If they’re packed too firmly, they won’t be as enjoyable to eat.
They can easily be made gluten-free. Just check the labels of both the cereal and the marshmallows and make sure you’re purchasing gluten-free brands. They need to be manufactured in a facility where there’s no chance of contamination from products that contain gluten.
Keep your Rice Krispie Treats in an airtight container at room temperature for 2-3 days, in the refrigerator for up to 5 days, or in the freezer for up to 3 months. Defrost frozen rice krispie treats in the refrigerator overnight and bring to room temperature before serving cold or frozen squares.
You May Also Like
- 50 of the Best Halloween Treats
- 20+ Halloween Treats
- Tunnel of Doom Cake
- Candy Corn Cupcakes
- Spider Web Cookie Cake
- Witches Fingers Cookies
- Easy Mummy Cookies
- Bloody Creme Brulee
- More Holiday Recipes

Rice Krispie Candy Corn Recipe
Turn the classic cereal treat into Rice Krispie Candy Corn with some food coloring and a cake pan for the ultimate Halloween treat!
Ingredients
For the yellow ring:
- 2 ¼ cups Rice Krispies cereal
- 2 ½ cups mini marshmallows
- 1 ½ tablespoons butter
- Yellow food coloring
For the orange ring:
- 1 ⅜ cups Rice Krispies cereal
- 1 ¾ cups mini marshmallows
- 1 tablespoon butter
- Orange food coloring
For the white center:
- 1 cup Rice Krispie cereal
- 1 ¼ cup mini marshmallows
- 1 tablespoon butter
Instructions
- Spray an 8-inch cake pan with non-stick cooking spray. Set aside. Have butter available to grease your hands and a spatula as needed for pressing treats into the pan.
- Form one ring at a time, starting with the yellow ring. Melt the marshmallows and butter for that ring in a microwave-safe bowl.
- Gently melt by stopping and starting the microwave at 15-second intervals. Stir to mix with a greased spatula, then add food coloring till the desired hue is reached. Stir in Rice Krispies.
- With greased hands and a greased spatula, pat yellow rice krispie treats around the perimeter of the pan to form about a 1 ½-inch ring.
- Repeat with the orange ring using the same procedure (except using orange food coloring) and form a second 1 ½-inch ring, leaving the middle open for the white center.
- Repeat with the last batch of marshmallows and butter and press into the center of the pan.
- Let cool for at least 30 minutes, then flip out of the pan onto a cutting board. Cut into 8 wedges to resemble candy corn.
Notes
Helpful Tools (affiliate links):
Recipe adapted from Glorious Treats.
Note: work quickly to form the rings while the mixture is still warm and pliable.
Recommended Products
As an Amazon Associate and member of other affiliate programs, I earn from qualifying purchases.
Nutrition Information:
Yield:
8Serving Size:
1 wedgeAmount Per Serving: Calories: 223Total Fat: 5gSaturated Fat: 3gTrans Fat: 0gUnsaturated Fat: 2gCholesterol: 13mgSodium: 152mgCarbohydrates: 44gFiber: 0gSugar: 23gProtein: 2g














74 Comments on “Rice Krispie Candy Corn Treats”
What an adorable idea for a Halloween party! Quick and easy but the best part it is easy to transport.
Liz, I haven’t made Rice Krispie Treats in a really long time! I love your creative presentation for these!! Super cute idea! 🙂
The parchment paper guide is a lifesaver, great tip! This idea also brings up lots of tasty possibilities.
Liz I love this recipe and have never made this version. Great tips and smart to outline on parchment.
I’ve only ever used marshmallow creme before but will try your method. In fact I’m going to run out today to get the ingredients. I can’t wait!!!
What a cool treat! I was trying to figure out how you made the triangle shapes and then saw the pan! Genius! I can see these becoming Christmas tree treats in December! Very cool.
I love rice Krispie treats and these look so like so much fun, no to mention, all the sticky goodness that these treats provide.
Totally cute! We are hosting a huge Halloween party in a week and these recipes have come just in time as looking for quick make ahead recipes.
These rice Krispy treats are so cute, and are perfect for Halloween.
What a fun “treat” idea for Halloween! I know a bunch of people who would love a slice or two (or twelve). Halloween or not. 🙂 ~Valentina
Liz, theses candy corn Rice Krispies treats are sooo cute! Love them!
Oh Liz, these candy corn rice crispy treat are so cool….what a great idea…perfect for the upcoming Halloween…thanks for the idea. Have a great rest of the week!
Liz, these are so fun! My kids would be thrilled with these. Candy corn is quintessential to fall and Halloween! 🙂
Dear Liz, what a fun recipe for Halloween – around here, candy corn is not known and not really available but I know it and it is such a fun candy for the kids. I like the fact that you were inspired by this seasonal candy to make your wonderful rice krispie treats!
Andrea
Such a FUN recipe! Very, very creative — really like the idea of this. Winner!
I rarely get store-bought crisp treats as they’re so boring and usually way too sweet! These little “candy corns” look wonderful. I would have added a pinch of pumpkin spice just for more autumn vibes into my version. But even without any additions, they must be delicious!
Looks like everyone had fun! I haven’t had a RKT in 100 years… Might want to correct that:@)
How adorable are these?! I had rice krispies lying around forever and was trying to figure out something fun to do with them – this post came at the perfect time. Will make these again closer to Halloween too! Right now I want to try to find a natural food coloring to use on them and see if it’ll work the same way.
Such a unique Halloween treat! I love how easy it is to make but looks like such a fancy treat.
My kids love these this time of year, thanks for sharing i had forgot how to make these…
Simon
I think these are adorable. I don’t love candy corn (too sticky sweet for me) but this version is much more my style. 🙂
I love rice krispies.. you gave me a new idea .. thanks for sharing !!
These are the cutest Rice Krispie Treats EVER! Very fun and creative!
Diane stole my comment! These are almost too cute to eat. ALMOST 😉
The colors are fine just as they are. Too bad we can’t take these kind of treats to my granddaughter’s school.
I love it when I can say “easy” and “festive” to describe the same food. Those candy corn krispy treats are just the ticket for a harried mom who wants to cheer her gang. Fantastic idea!!
What a fun rice krispies treat. 🙂 These are a definite Halloween winner.
I think these treats are adorable. Rice Krispie Treats are something I act nonchalant about until I’m around them. That’s when the “are-you-gonna-eat-that” glances begin! These are so cute I bet Taylor will love these. 🙂 I hope you are having a good week!
cool you are very creative.
Very cute!!! Love these… So festive!
Oh, that’s plenty of food coloring for me. These look great! And what a coincidence…I’ve been CRAVING rice krispies treats lately!
What a cute idea! How fun! I have a class halloween party coming up at my daughter’s school and have been looking for a few unique treats to make. Everyone loves rice krispie treats and I love that they look like candy corn. Adorable!
Too cute! I love it
I think these are absolutely spot on!!
Ooohhh, I love Rice Krispies Treats. These are so cute! Love them 🙂
I don’t know what you are talking about but these look perfect! I’ll take one (or two) please!
These are so cute and creative, Liz! I bet SO delicious, too! What a great treat for Halloween.
I always get hungry for candy corn at this time of the year, and so we always buy a bag, and that’s it until the next year! We should just make these great Rice Krispie candy corns instead – they look even better than the real stuff. Plus we’d get to make them, always a bonus. Good stuff – thanks.
These are so cute!
So cute! I haven’t made Rice Krispie treats in forever. I’m ready…
Very interesting ideas and those look really cute 😀
So cute! Halloween is my favorite holiday of the year, so this is a fun idea for me.
Adorable I thought the color is perfect to me,I’m not candy corn fan,but I love these yummy rice krispies 🙂
The colors look perfect to me. I love how you cut the rice krispies. These are the perfect treat for Halloween.
That was very generous of you to take all the uni boys out for dinner. I’m not sure my credit card could have handled it because like you say, they sure can eat! I bet you’re very popular with the uni set. I’m yet to find candy corn in any store in Oz! xx
Sooo cute! What a brilliant idea, Liz!
Adore these, my boys would so love to make them.
These are so cute! My best friend ADORES candy corn, so I imagine she’d be thrilled with a batch of these arriving on her front door. Thank you for sharing!
What an excellent idea! They are very delicious.
oh so cute! My kids are going to love this
With no little ones at home, I feel a little guilty making Rice Krispie treats. But make them I will. 🙂 These are so cute!
These are adorable! Perfect for the season.
Very cute Liz. And I’ll bet your son’s friends thought so, too! LOL! Hope you had a great dinner. I am sooo missing those moments.
Aaw these rice krispie candy corns are so cute! These make such a fun Halloween treat, Nick and his friends must have loved these 🙂 Love how festive they look!
What a cute and festive idea!
Liz, these are SO cute! I’m going to make these for my students at school!
Ha I totally hear you on the food coloring part. When I attempted my cheesecake cake, I couldn’t get the orange just right. It was more of a pale orange than Halloween orange. Do you think they make Halloween orange food coloring? Lol Don’t worry – I’ll still gobble these up regardless 😉
These are so darn cute Liz. I think I’m going to have to make this to give to the neighborhood kids for Halloween. The possibilities are just endless with Rice Krispy Treats. If you can imagine it you can make it. Love this idea!
So cute Liz and I know those boys loved such fun treats. I have a feeling that you’ll be developing a reputation at his college as the queen of delicious treats 🙂
What a great idea to put these in a cake pan! They look just like candy corn, I’m a little jealous of your son and his buddies now!
Aww, how clever and just the thing a fantastic mom would do. I’d probably send a box of rice krispies and a jar of marshmallow and say, “have a go.” LOL
Can you believe we have NO candy corn in Australia? I know. Weird.
Halloween Candy Corn was Michael Hirsch’s favorite holiday candy – that includes all the Christian, Jewish and secular holidays). He would buy them by the bagsful and I would caution how all that sugar wasn’t good for him!!! This year, as always, I have a bowl full of candy corn sitting on the mantle. I love RKT in an form – yours look delish.
Adorable! And what a good mom you are 😉
I think you’re being generous when you say Nick ‘n his friends had treats for a few nights. Guaranteed they inhaled everything in an hour, lol. These are adorable, Liz and I think the colour comes through just fine!
How fun, I love this idea for a Halloween party!
I love these. They are perfect for Halloween. Rice Krispie treats are a favorite of ours. As always, you did a terrific job. Thanks for sharing.
Woke up asking myself how it got to be nearly Halloween and I don’t have any treats planned when, voila! This round up appeared to save the day. These candy corn treats are so darn cute, the only proper thing to do is gobble them up 🙂
What a fun holiday idea!
Who cares if the colors are a perfect match? Not me! These a so fun and much better than real candy corn.
What a cute treat, Liz! I love RKT’s.
Hi Liz!
Guess what October 30th is? That’s right, National Candy Corn Day! Guess what I’ll be making? Rice Krispie “Candy Corn”! Marion will love it! You did great! Not only with the treats but with that html coding of yours too. I’m going to attempt something similar for the Pasta Party. Wish me luck!
Thanks for sharing, Liz. I’ll be adding this to my Candy Corn board, lol…
Very cute! I like the idea of making them in a round pan:@)
Liz, these are uber cute! I just want to bite off the tip. Pinned.
I adore regular ole rice krispie treat the most so all the holiday additions that people put in them do nothing for me. That makes these perfect. I love, love, love them! And, just so you know, you’ve set the bar very hard for when Dudette goes to college. If I ever let her know how much you bake for Nick, my oven will never be off!
A treat with or without colouring! I adore candy corn and this looks like a perfect Halloween treat!