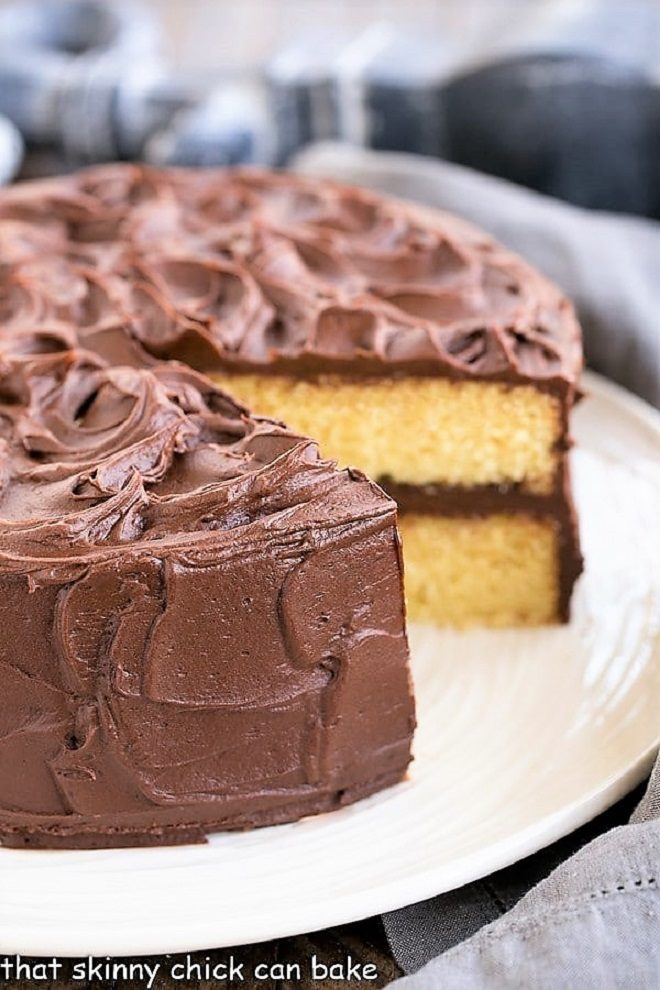
Best Yellow Cake Recipe with Chocolate Buttercream
When Bill’s birthday rolls around, he invariably requests my Best Yellow Cake Recipe paired with a dreamy Chocolate Buttercream Frosting!
Homemade Yellow Cake is tender, moist and so much better than a box mix. It’s perfect for any occasion!

Why You Should Make This Yellow Cake
This Perfect Yellow Cake Recipe with Chocolate Buttercream was hubby’s birthday cake again this year. Even though he is a chocoholic through and through, he picks a cake he knows Miss Katie would love. It’s no wonder she has a sign above her bed that reads “The Queen’s Bed” in curlicued calligraphy.
- I used Smitten Kitchen’s moist yellow cake recipe. Her recipes are nearly foolproof.
- Made with buttermilk, it’s sweet and tender with a fine crumb.
- Paired with chocolate frosting gave the chocoholics their fix without having to make a chocolate cake.
- My whole family gave this cake rave reviews!!
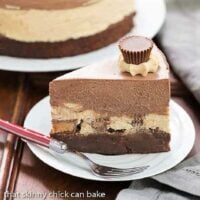
Best Chocolate Buttercream Frosting
Whenever I make a yellow cake, it must be paired with a rich, chocolate buttercream frosting! Chocolate rules for the majority of the family and, to tell the truth, this is a magical pairing. So if you have a birthday celebration on the horizon, I recommend this terrific combination, the perfect yellow cake recipe with a fudgy frosting!
Frequently Asked Questions
A yellow cake has whole eggs so the yolks give the cake extra richness along with its yellow color. A white cake typically contains only egg whites. Both are flavored with vanilla.
Many ingredients contribute to the moistness of this cake. Besides adding flavor, the butter slows down gluten formation and provides moisture. Sugar also breaks up gluten and helps absorb liquids. Plus, the eggs provide fat which also adds moisture to the cake.
Once it’s cut, the exposed cake should be covered with plastic wrap so the cake does not dry out. The cake can be kept at room temperature for 3-4 days.
Leftover cake slices can be wrapped well or placed in an airtight container and frozen for a month or two. Freezing a whole frosted cake is not advised, as the frosting will most likely not fare well with moving, freezing, and thawing.

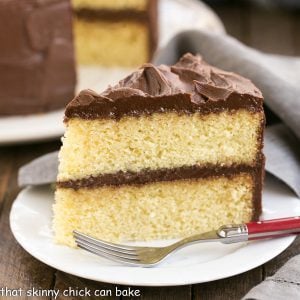
Tips for Making a Layer Cake
Making a layer cake can be daunting. First, there’s dividing the batter in half, then hoping the layers bake up flat, and finally trying to frost it so it looks like it came out of a bakery! Here are a few tips to get you started:
- PRO-Tip: I like using a kitchen scale to divide my cake batter so that the layers are even.
- If the tops of your layers are rounded, trim the tops off so you’ll have a flat surface to frost.
- If you trim the cakes, put the bottom side up so you’ll have fewer crumbs to deal with as you frost.
- You can also do a crumb coat, which is a thin layer of frosting over the top and sides of each layer. Chill so the frosting hardens a bit, then frost as desired.
- Make sure your layers are completely cooled before frosting.
- Using cake flour and buttermilk both contribute to making this a tender cake.
- PRO-Tip: If you don’t have any buttermilk on hand add one tablespoon of lemon juice or white or cider vinegar to a liquid measuring cup. Fill it to the one-cup mark with whole or 2% milk. Stir it and let rest for a couple of minutes then use in place of store-bought buttermilk in equal amounts.
- PRO-Tip: If you don’t have any cake flour on hand, measure out a cup of all-purpose flour. Remove 2 tablespoons, then sift together the 14 remaining tablespoons of flour plus 2 tablespoons of cornstarch 3 times. Use this mixture instead of cake flour.
- I place the bottom layer of the cake on the serving plate, then I like to tuck little strips of parchment or wax paper around the perimeter to catch any frosting drips that might land on the cake plate.
More Recipes for Birthday Cakes You’ll Love:
- Birthday Cake Roll from Crazy for Crust
- Birthday Cake Brownies from Back for Seconds
- Birthday Cake Mix Cookies Recipe from Crunchy Creamy Sweet
- White Birthday Cake
- Chocolate Fudge Layer Cake
- Angel Food Cake Recipe
Perfect Yellow Cake Recipe with Chocolate Buttercream
A classic combination of a fine crumb yellow cake and dreamy chocolate frosting! Perfect for any celebration!
Ingredients
For the cake:
- 4 cups plus 2 tablespoons cake flour
- 2 teaspoons baking powder
- 1 ½ teaspoons baking soda
- 1 teaspoon salt
- 1 cup butter (2 sticks), at room temperature
- 2 cups sugar
- 2 teaspoons vanilla
- 4 eggs, at room temperature
- 2 cups buttermilk
For the frosting:
- 1 ½ cups butter (3 sticks), at room temperature
- 1 cup cocoa powder
- 5 cups powdered sugar, sifted
- ½ cup milk
- 2 teaspoons vanilla
Instructions
- Preheat oven to 350°.
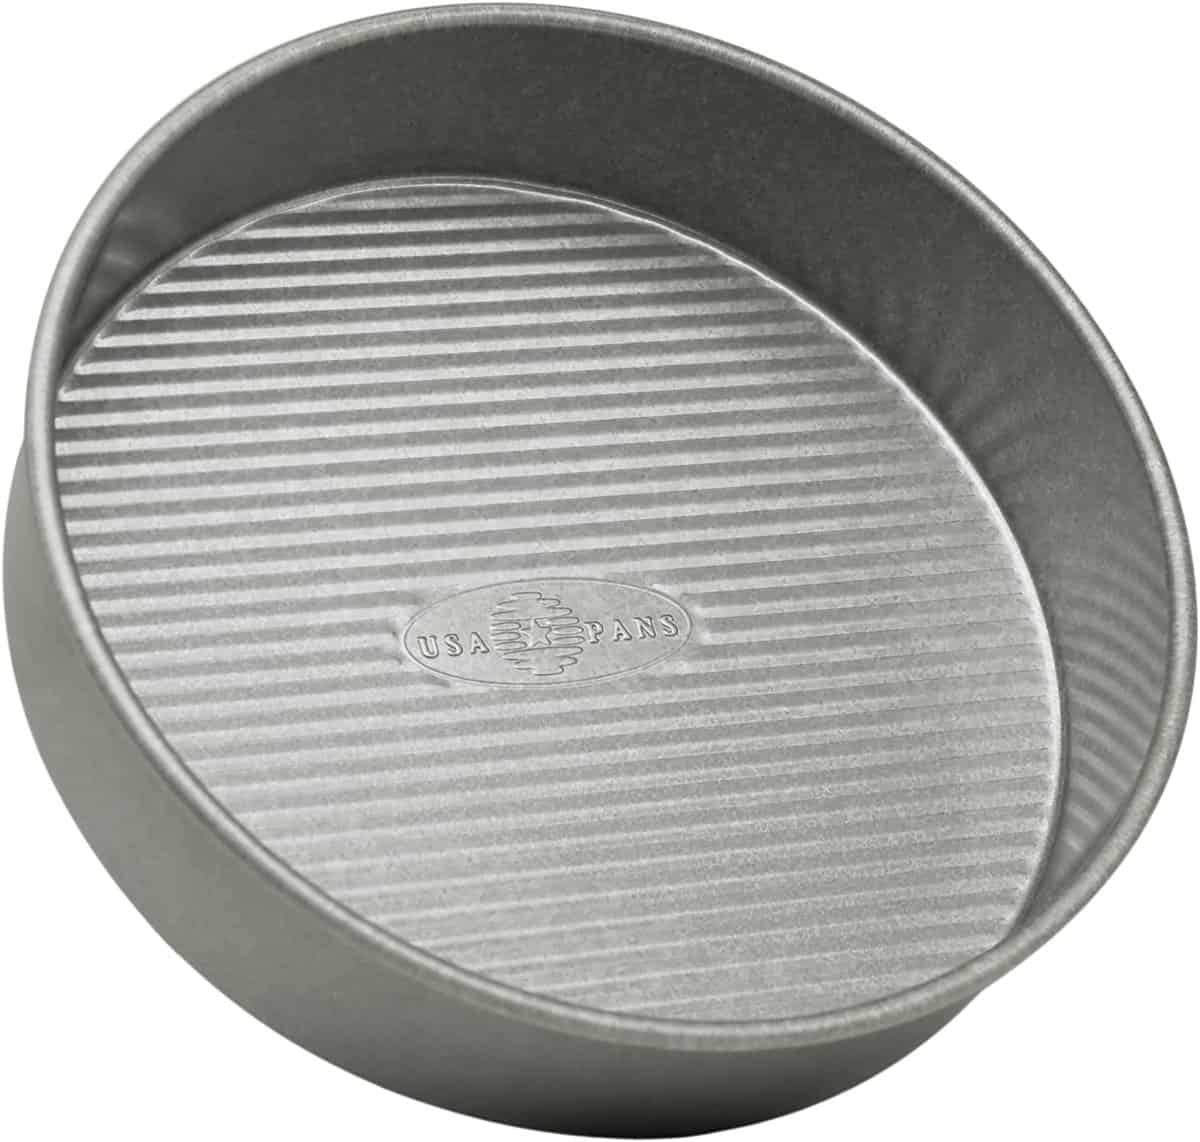
- Butter two 9-inch round cake pans and line with circles of parchment paper, then butter parchment (I use an oil/flour cooking spray like Bakers Joy).
- Whisk together flour, baking powder, baking soda, and salt in a medium bowl.
- In your stand mixer, beat butter and sugar on medium speed until pale and fluffy, then mix in vanilla.
- Add eggs one at a time, beating well and scraping down the bowl after each addition.
- Mix in buttermilk until just combined (will not be smooth).
- Add flour mixture in three batches, mixing until just combined. Be careful not to over-mix as this will toughen the cake and cause big air bubbles.
- Spread batter evenly in cake pans. Drop the cake pans onto the counter from a few inches up to release any air bubbles, 2 or 3 times.
- Bake until a toothpick inserted into the center of the cake comes out clean, 35 to 40 minutes.
- Cool on a wire rack for about 10 minutes, then invert, remove cakes from pan, and let finish cooling.
- To make the frosting, place the cocoa in the bowl of your stand mixer. Mix with a whisk attachment to remove lumps. Add the butter and cream until smooth.
- Alternate the powdered sugar and milk by adding about a cup of powdered sugar and a tablespoon of milk, mixing, and then repeating until all is incorporated.
- Add vanilla and mix to combine. You may adjust the powdered sugar and milk if you need a thicker or thinner frosting.
Notes
Check the expiration date on your baking powder. It usually expires before it is used up.
Cake adapted from Smitten Kitchen. Frosting adapted from Add a Pinch.
Recommended Products
As an Amazon Associate and member of other affiliate programs, I earn from qualifying purchases.
Nutrition Information:
Yield:
16Serving Size:
1 sliceAmount Per Serving: Calories: 547Total Fat: 31gSaturated Fat: 19gTrans Fat: 1gUnsaturated Fat: 9gCholesterol: 125mgSodium: 620mgCarbohydrates: 65gFiber: 1gSugar: 60gProtein: 4g
Thatskinnychickcanbake.com occasionally offers nutritional information for recipes contained on this site. This information is provided as a courtesy and is an estimate only. This information comes from online calculators. Although thatskinnychickcanbake.com attempts to provide accurate nutritional information, these figures are only estimates. Varying factors such as product types or brands purchased can change the nutritional information in any given recipe. Also, many recipes on thatskinnychickcanbake.com recommend toppings, which may or may not be listed as optional and nutritional information for these added toppings is not listed. Other factors may change the nutritional information such as when the salt amount is listed “to taste,” it is not calculated into the recipe as the amount will vary. Also, different online calculators can provide different results. To obtain the most accurate representation of the nutritional information in any given recipe, you should calculate the nutritional information with the actual ingredients used in your recipe. You are solely responsible for ensuring that any nutritional information obtained is accurate.


52 Comments on “Best Yellow Cake Recipe with Chocolate Buttercream”
I just got done 6 inch pans that I can’t wait to try out. Do guy think I could use those for this? (I have 4 of them).
Yes, I think you could, Dawn. Sorry, I missed your comment. The oven temperature should be decreased and (of course), the baking time should be decreased. Let me know how it goes!!!
Can I use a 10″ Bundt pan for this recipe?
Hi, Yvette,
That’s a great question. I did a little research and I found one source that stated that if the cake recipe is for two 8 or 9 inch round cake pans AND that it calls for 2 ½ cups of flour or less, it should work. Since this cake calls for over 4 cups of flour, I’m not sure I’d risk it. I haven’t tested it and I’d hate for you to go through all the work and have it not work perfectly!
Hi Liz, Can you use this recipe for cupcakes!
Yes, most cake batter can be made into cupcakes (though I haven’t tested this recipe). The cooking time will vary, but somewhere around 15-20 minutes. Just check by inserting a toothpick—they’ll be done when it comes out clean.
I can’t wait to make it again!
It’s the most delicious cake, I love making it.
Yellow cake is my fave- this is a great recipe!
My kids loved this! Such an amazing cake recipe!
Such a great recipe to have on hand. I love the chocolate buttercream too. Great pairing for sure. Thanks for sharing.
The perfect yellow cake + chocolate buttercream combo!
The perfect pairing! Delicious.
The BEST birthday cake ever!
Do you use unsalted butter?
Hi, Megan,
I use salted butter unless stated otherwise. I usually adjust the salt in the recipe if my inspiration calls for unsalted butter.
I would be licking the spoon for both the frosting and this cake! YUM!
I made this cake for my husband and little ones today and it was a big hit!!! So delicious, moist and fluffy, just everything that you would want out of a yellow cake! I have been trying to find a good yellow cake recipe and this one was perfect! I didn’t try the chocolate buttercream as I had another recipe in mind, but looks delicious and will definitely try next time. Thank you so much for sharing! ☺️
I’m so glad it was a success! Thanks for taking the time to let me know, Jay!
I love scented cakes like these, dear! xoxo
WIth this cake (with regard to consistency), do you recommend doing a crumb-coat, refrigerating and then doing the actual frosting layer? Thanks!
PS: Skinny chick? Do you eat your own baked goods?
Hi, Monika,
I did not do a crumb coat, but it certainly wouldn’t hurt. I usually just sample a sliver. For the most part, I have pretty good will power, but if I don’t, I just make sure to get on the treadmill that day 🙂 Hope you enjoy the cake!
Happy Birthday to Bill and how sweet that he picks a cake that your daughter loves.
It doesn’t get much better than classic yellow cake with chocolate frosting. It definitely screams birthday!
This is such a classic flavor combo.
What a beautiful classic cake! The frosting sounds so decadent with all that cream. Who wouldn’t want to eat it by the spoonful?
Out of all the desserts I make, yellow cake is my favorite! This looks so delicious and the fudge icing sounds incredible!
I can see myself eating that frosting with a spoon! And your pictures are very nice.
Birthday wishes to your husband….cake looks perfect and yum….love that icing….looks drool worthy….
This is the birthday cake of choice in my family! We are all about the yellow cake and chocolate frosting. Thank you so much for sharing with me tonight. I always know I will find something that will make me smile! Your sweet and creative spirit brings me such happiness. I hope you have a great day tomorrow full of hope and love.
Happy birthday to your husband.
the cake is so beautiful. love the chocolate fudge frosting.
have to check the yellow cake, love the sound of a buttermilk cake.
Thanks for sharing Lizzy
this is a fabulous looking cake lovely icing
I’m a chocoholic too, but sometimes I love a simple yellow cake with chocolate frosting. A nice balance, the best of both worlds. Happy birthday to your hubby!! April babies are the best 😉 I’m one too!! haha
That cake looks delightful! I love 3 layer cakes and yellow cake with chocolate icing is one of my favorite combos too. It just says “birthday” to me! Hope your hubby had a great day!
Hi Lizzy,
Oh I hope this cake will make me skinny cause I love yellow cake.. I am your newest follower.- Marelie
I love yellow cake and this looks perfect! Will definitely be trying this recipe. Thanks!
This looks really, really good. I’d love to have a piece of it with my coffee this afternoon. I hope you have a great day. Blessings…Mary
This is such a classic cake and perfect for a birthday. It looks beautiful to me. Happy Birthday to your husband!
One of my favorite combinations, leftovers – please send them this way.
Happy Birthday to your husband…Looks amazing…My mom used to make this cake for all of our birthdays, but she made the fudge icing with only cocoa powder.
Tjhis cake look amazing and delicious, perfect! gloria
Oh my gosh, that icing…wow, it’s picture perfect! Lucky Hubz!
Happy Birthday, hubby!!
Happy Birthday to you hubby, Lizzy!
You’re the best! There is such a great satisfaction making dessert for our loved ones, especially a home made yummy yellow cake with chocolate fudge home made frosting. Nothing better than a yummy delicious home made cake. Would love to have a slice of that cake:D
Thank you for all your kind caring and support at this difficult time with Lora’s surgery. It meant a lot to us. Yes, Lora is still my baby…and always will be. She is such a good daughter…when she’s in pain, I wish I could take that pain away:-(
xo
Lizzy – it looks beautiful – as do all of your creations! I know I would love this cake too. Yellow cake and chocolate frosting just go together perfect in my book. It was sweet of your hubby to think of what his “little queen” would want..lol.
Brandie
I’m new at blogging and first of all love the title of your blog. Second, this cake looks perfect to me. I’m your newest follower.
An amazing looking cake, so gorgeous!
two perfect combinations of flavor this cake looks fabulous~
Lizzy,
Yum! Yum! Yum! Bill is a lucky man 🙂
I showed Alex this post as he was leaving for work and he said, “Your birthday is coming up, that looks like a good cake for the occasion!!!”
I wonder if I should make a copy of the recipe, so he can surprise me 😉
Hugs,
Sandra
Cake looks amazing! Cake is so soft and icing so chocolaty.. 🙂 great combination. Happy Bday to your husband and he is really lucky that he has got a great wife who is baking such treats for him 🙂
Lizzy this cake sounds wonderful! Especially for a Birthday! The frosting looks so fudgy, and would be perfect with that delicious butter cake! Happy Birthday to your husband! I’ll bet he loved the cake :)!
This looks great! Such a classic dessert!
yum! Love your beautiful glass cake stand.