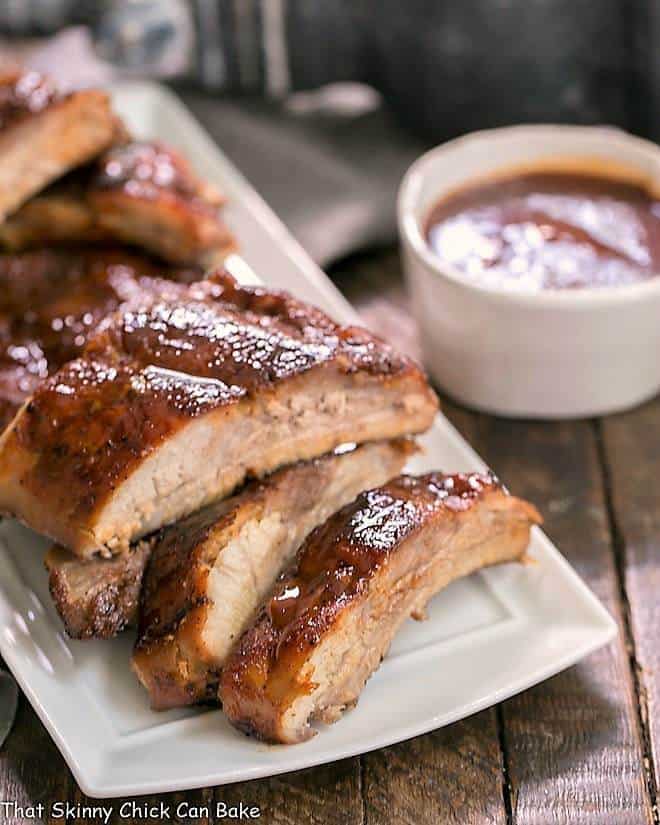
Instant Pot Baby Back Ribs
After making Instant Pot short ribs to rave reviews from the family, I started fixating on a baby back ribs version. These Instant Pot Baby Back Ribs were started in the pressure cooker to quickly cook and tenderize, then finished in a hot oven with barbecue sauce.
I love tossing baby back ribs on the grill, but the monsoon season has hit Indiana this summer, and now I have a baby back rib recipe that can be cooked all year round, no matter the weather!

Note: This post may contain affiliate links; view my Disclosure Policy for details. I earn a small percentage from any purchase you make by clicking on these links at no extra cost to you.
Instant Pot Baby Back Ribs
The process to make these instant pot baby back ribs starts out like my other rib recipes. I mix up a flavorful rub with sugar, salt, and spices and smear it over the ribs the night before I plan to make them. This mixture will act as a dry brine and let the meat absorb some of the flavorings.
When it’s an hour or more before serving time, cut into each rack into quarters, and stand them up in the Instant Pot along with some broth, before cooking under high pressure for 30 minutes. After a quick release, I popped these ribs in a hot oven doused with barbecue sauce to brown.

What Are Baby Back Ribs?
Baby back ribs are pork ribs that are visible when the loin of pork is removed. The upper ribs are smaller and were dubbed “baby” back ribs when compared to the lower, larger back ribs. Baby back ribs typically take low, slow cooking to ensure they’re tender. But today, you’ll learn that’s not always the case! My family loved these Instant Pot baby back ribs.
How to Make Pressure Cooker Baby Back Ribs
Baby back ribs are leaner and more tender than many other forms of ribs, so it’s what I reach for first when I want ribs for dinner. Here are some tips for how to cook baby back ribs.
- When you purchase your ribs, ask the butcher to remove the membrane or silver skin from the bony side of the ribs. You can do this at home, but it’s nice when you can skip this step.
- Buy smaller racks, around 2 pounds, for more tender ribs. And allocate 1 pound per person.
- Make sure you have a flavorful rub. You can purchase some terrific pre-made rubs or make your own as I did. I like the combination of salt, sugar, and spices.
- Coat the ribs with your rub the night before you plan to cook for the best flavor infusion.
- The method you use for cooking depends on your preference. Before trying this Instant Pot recipe, I would slow cook in the oven until very tender then finish off on the grill, like with my fall off the bone baby back ribs that I linked to at the top of this post.
- Glaze with your favorite barbecue sauce using a silicone basting brush. Again, the sauce can be purchased or homemade. Brush on at the end of cooking time so it does not burn.
- PRO-Tip: According to the USDA, pork is safe to eat at 145 degrees, but the connective tissue does not start to break down until closer to the 160-170 range. So if you pull your ribs out at 145, they’re bound to be tough. 185-195 degrees allows time for the ribs to become tender. This will occur in a shorter amount of time in the Instant Pot. But on the grill or in the oven, low and slow is the way to go.
- Whether you try these Instant Pot baby back ribs or a more traditional method, pass your ribs with extra barbecue sauce and lots of napkins!!
If you’re a fan of the Instant Pot, you’ll want to try this Whole Chicken in an Instant Pot. There are so many dishes you can make with the meat! Instant Pot Beef Barbacoa makes quick work of making beef for tacos, burritos and more. Even Corn on the Cob can be cooked in a red hot minute!
Don’t forget the dessert and try this Instant Pot Cheesecake or how about a dreamy IP Dulce de Leche!
Instant Pot Baby Back Ribs
A quick recipe for fall off the bone baby back ribs using the Instant Pot and oven.
Ingredients
Spice Rub
- 2 tablespoons kosher salt
- 2 tablespoons brown sugar
- 2 teaspoons chili powder
- 2 teaspoons paprika
- 1/2 teaspoon celery seed
- 2 teaspoons garlic powder
- 1 teaspoons cayenne pepper
- 1/2 teaspoon ground black pepper
Ribs
- 2 racks baby back ribs
- 1 cup broth, I used chicken but beef works, too
- Barbecue sauce
Instructions
- Combine spice rub ingredients in a small bowl.
- Line a sheet pan with foil and place the racks on top. Rub the meaty side of the ribs with the spice rub, flip and rub any excess on the back side. Turn the ribs back over and cover with plastic wrap.
- Cover the ribs with plastic wrap and refrigerate overnight.
- When you're ready for the first stage of cooking, cut the each rack into 4 pieces.
- Add the broth to your Instant Pot, then stand the ribs upright. CLOSE and LOCK the lid. Make sure the vent is closed. Close and lock the lid. SELECT high pressure and SET the timer for 30 minutes.
- Near the end of the cooking time, preheat the oven to 425 degrees. Line a baking sheet with foil and place an oven safe baking rack over the baking sheet. Set aside.
- When the Instant Pot is finished cooking, carefully do a quick release of the pressure. Check your manual if you're unsure how to do this as you don't want to get burned.
- Remove lid and place the ribs on the prepared rack over the baking sheet. Brush barbecue sauce on both sides of the ribs.
- Cook for about 15 minutes, turning the ribs at the halfway point. Brush with more barbecue sauce if needed.
- Serve with more barbecue sauce if desired.
Notes
Instant Pot technique adapted from AllRecipes.
Nutrition Information:
Yield:
4Serving Size:
1/2 rackAmount Per Serving: Calories: 682Total Fat: 42gSaturated Fat: 15gTrans Fat: 0gUnsaturated Fat: 25gCholesterol: 172mgSodium: 3815mgCarbohydrates: 24gFiber: 2gSugar: 18gProtein: 49g


18 Comments on “Instant Pot Baby Back Ribs”
These were absolutely delicious. My husband said the IP was even better than the smoker!
I would have to tell my rib loving family after the fact that they were prepared in an Instapot. They look delicious!
I sure would love to have one of those ribs. I would have to bake them in the oven since I don’t have an Instant Pot.
Dear Liz, ribs are also a family favorite at our house, particularly in summertime. These looks quite wonderful, delicious and certainly addictive!
Another marvelous recipe!
No instant pot or slow cooker…they will go in the oven and finish on the grill. Love baby back ribs.
I’ve been debating to get an instant pot and you just convinced me to get one now. Saving this recipe now because I will need it soon.
Yet another good reason to get an Instant Pot! One of these days I’ll break down and get one. And these ribs will be the first thing I’ll make. LOVE ribs. Any BBQ, really. Good stuff — thanks.
I have to give this a try! I’ve been craving ribs anyway – and made in the instant pot – they must be so tender. Great recipe Liz!
Love this recipe so much that taking advantage of amazon prime days and ordered an instant pot! Yeah. These looks so tender and delish! Sharing, of course!
Can you make these in a traditional pressure cooker? The instant pot seems nice but frankly, I just don’t have the space for any more one hit wonders! I’ve made ribs in the slow cooker and they were good too. Going to snag your dry rub recipe though!
I think so, Eva! If not for the kitchen renos (still no kitchen!), I’m not sure I would have ever purchased one, either. But it has come in handy!
My family would love these ribs. They look so delicious!!
A summer time favorite:@)
These look wonderful Liz. I haven’t made ribs yet this year and love them. I really need to. Although as I mentioned earlier I don’t have an InstaPot. My daughter mentioned to get one as they were on Prime special yesterday on Amazon. I’m a gadget gal but trying not to collect so much – I have an army of gadgets and tools. Your recipe looks great so I think I’ll try it the old fashioned way!
Now those are some gorgeous ribs! WOW
I love ribs! Instant pots make life so much easier. I haven’t got one yet because there isn’t enough storage space in my kitchen.
Definitely love to dig into those ribs, Liz! xoxo
Yum yum! Wish I could grab one to try!