Brazilian Cheese Bread
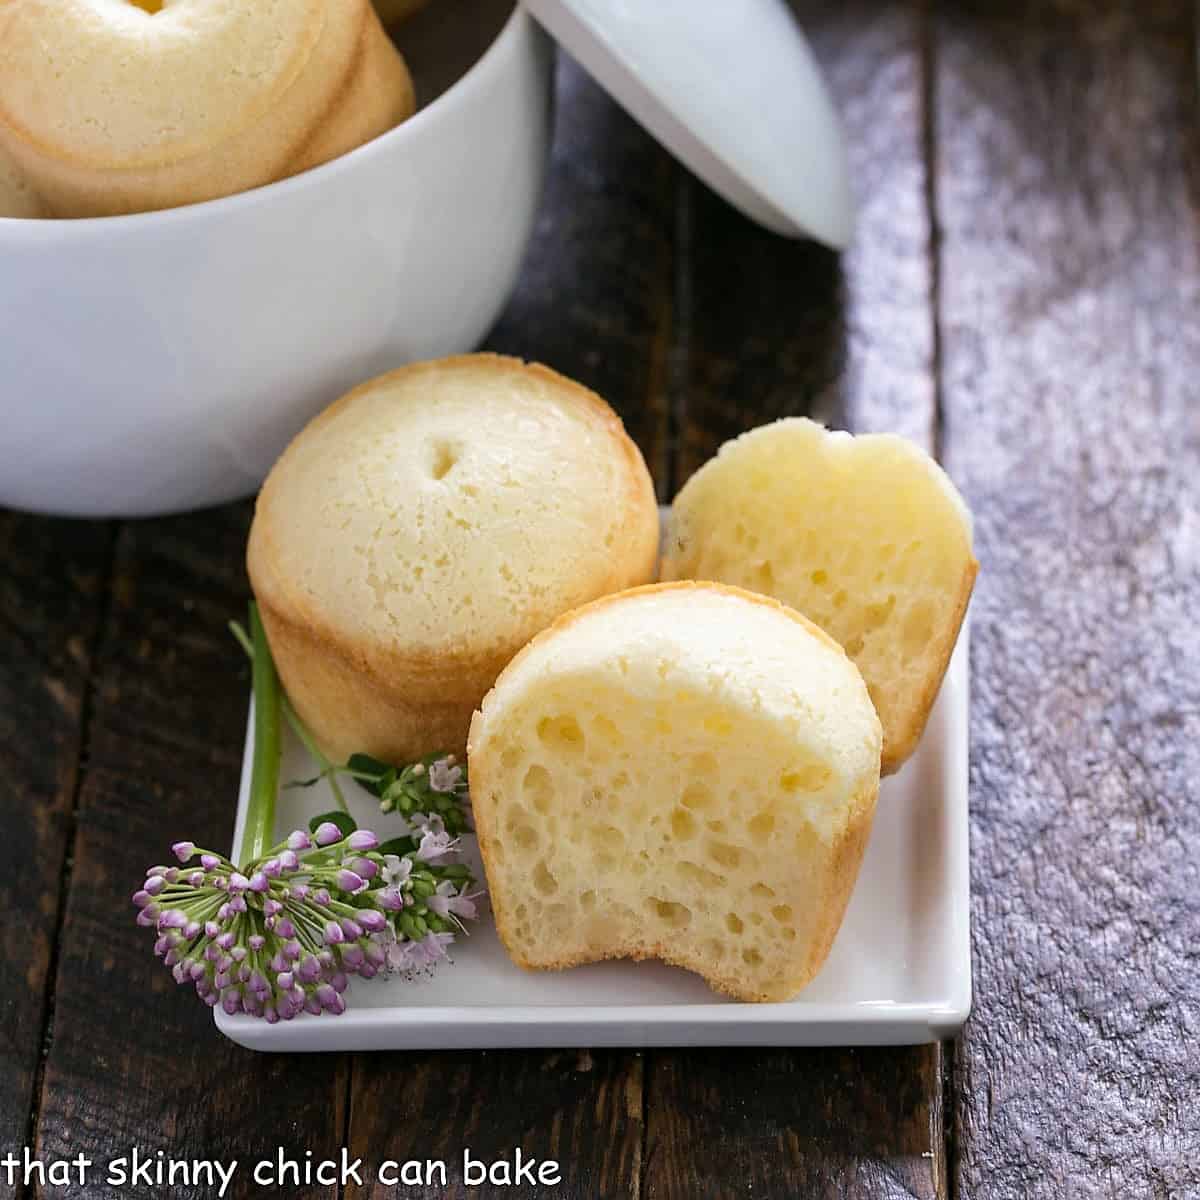
It took a little prodding but this easy Brazilian Cheese Bread finally made an appearance on our menu! Soft, cheesy with a texture almost like cream puffs, these Pão de Queijo were a hit.
Both my son and friend, Kathy, had mentioned the same Brazilian Cheese Bread Recipe, and since I had Tapioca Flour in the pantry, it was meant to be!

Why You Must Make
- Pao de queijo or Brazilian cheese bread, is a delicious snack or addition to any meal.
- They’re super easy to make! Just toss everything in the blender, then pour into a well greased mini muffin tin.
- Making these will expand your culinary repertoire to include a South American dish.
- Plus, they’re naturally gluten-free!
Ingredient Notes
- Egg – I use large eggs. Have at room temperature. Either bring it out of the refrigerator an hour or so before you start mixing or let it sit in a bowl of very hot tap water while you prep the other ingredients.
- Extra Virgin Olive Oil – Contributes the elasticity to the dough.
- Milk – I used 2% but whole milk would make them even richer.
- Tapioca Flour – Also known as Tapioca Starch, Manioc or Cassava. It’s native to South America.
- Grated Cheese – I used Mozzarella and Parmesan, but any grated cheese will work.
- Salt – Table salt is perfect. Salt is a flavor enhancer so don’t leave it out.
Tips for Making this Tapioca Bread
- First, track down some tapioca flour or tapioca starch. I’ve found Bob’s Red Mill’s brand at Whole Foods. Note: This is not the same as pearl tapioca that you use to make pudding.
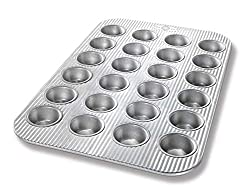
- My biggest tip is to grease the muffin tin very, very well. With my first attempt, I had to chip them out of the pan. We even loved them slightly smashed! You can use a flour and oil baking spray, but I found that Crisco worked well. Plus it’s best to use a relatively new nonstick mini muffin tin.
- PRO-Tip: Brazilian Cheese Bread is naturally gluten-free, which is a bonus. Don’t use a baking spray with flour if serving them to someone who is on a gluten-free diet.
- The batter will hold overnight in the refrigerator if you want to make it ahead. Just keep it in the blender, covered. The spout is very useful for filling the tins.
- They are best on the day they’re made, but we had no trouble eating them for a few days.
- You can shake up the cheeses or even add some herbs for a change of pace. I used Mozzarella and Parmesan, but Cheddar or Swiss cheeses would also taste wonderful.
- PRO-Tip: The batter will keep for up to a week in the refrigerator if kept covered. You may want to give it a good whisk before using.
- More traditional recipes have you make and bake dough balls, but I found using a muffin tin made fast work of making and baking these Brazilian cheese puffs.
Frequently Asked Questions
Brazilian Cheese Bread is a typical Brazilian snack that originated in Minas Gerais. Linked back to slaves in the 1600s who used the starchy roots of the yucca plant for flour to bake up these “bread-like” rolls or puffs.
Local cheese and milk were added in the late 1800s when dairy became available in the area.
Tapioca Flour (or tapioca starch, Cassava Flour, or Manioc Starch, Lard, Oil, Butter or Margarine, Egg, Cheese, and occasionally Milk. They are naturally gluten-free.
In Brazil, a cheese from the area of Minas Gerais is used. Americans like to substitute Parmesan or a mixture of Parmesan and mozzarella since they are readily available. Queso Fresco is also used.
They are best eaten warm, but if you have leftovers, store them in an airtight container at room temperature or in the refrigerator for a few days.
Yes, just reheat them for a couple of minutes in a 400-degree oven.
If you eat them for breakfast, they’re excellent served with fresh fruit, butter, and jam. They’re also delicious paired with lunch or dinner with soup, salads, or your entree in place of other bread.
You May Also Like
- Spinach Puffs from Lil’ Luna
- French Cheese Puffs
- Japanese Milk Bread
- Angel Biscuits
- Homemade Croissants
- More of the Best Quick Bread Recipes

Brazilian Cheese Bread
Light, airy, cheese bread from Brazil! Made in the blender for a quick and easy snack.
Ingredients
- 1 egg, room temperature
- ⅓ cup extra virgin olive oil
- ⅓ cup milk, at room temperature
- 1 ½ cups tapioca flour
- ½ cup grated Parmesan cheese
- ¼ cup grated Cheddar cheese
- 1 teaspoon salt
Instructions
- Grease mini muffin tin well with shortening (Crisco) and set aside.
- Preheat oven to 400°
- Put all ingredients in the blender and process until smooth. Scrape down the sides with a spatula as needed during the process.
- Pour into a mini muffin tin, leaving at least 1/8-inch of space at the top to allow for expansion.
- Bake for 15-20 minutes until puffed and lightly browned.
- Let cool on a cooling rack for a just a couple of minutes, then carefully remove to a cooling rack. If you wait too long they will be difficult to remove from the pan.
- They are best eaten warm.
Notes
Try this cheese bread with any of your favorite grated cheeses.
Recommended Products
As an Amazon Associate and member of other affiliate programs, I earn from qualifying purchases.


Nutrition Information:
Yield:
6Serving Size:
2 cheese puffsAmount Per Serving: Calories: 285Total Fat: 17gSaturated Fat: 4gTrans Fat: 0gUnsaturated Fat: 12gCholesterol: 44mgSodium: 552mgCarbohydrates: 29gFiber: 0gSugar: 2gProtein: 5g
Thatskinnychickcanbake.com occasionally offers nutritional information for recipes contained on this site. This information is provided as a courtesy and is an estimate only. This information comes from online calculators. Although thatskinnychickcanbake.com attempts to provide accurate nutritional information, these figures are only estimates. Varying factors such as product types or brands purchased can change the nutritional information in any given recipe. Also, many recipes on thatskinnychickcanbake.com recommend toppings, which may or may not be listed as optional and nutritional information for these added toppings is not listed. Other factors may change the nutritional information such as when the salt amount is listed “to taste,” it is not calculated into the recipe as the amount will vary. Also, different online calculators can provide different results. To obtain the most accurate representation of the nutritional information in any given recipe, you should calculate the nutritional information with the actual ingredients used in your recipe. You are solely responsible for ensuring that any nutritional information obtained is accurate.


6 Comments on “Brazilian Cheese Bread”
can they be made a bit larger? I don’t have a mini muffin pan.
Yes, just make sure to adjust the baking time so they are thoroughly baked. Hope you enjoy!
This looks great — love the way it looks. Nice texture — thanks.
I’ve never heard this Brazilian bread nor used tapioca flour for baking. But these look terrific; beautiful texture. And the cheese? Yes please!
o my…my comment again doesn’t show up :-(( No idea why…
They look wonderful! I had the bread long long long time ago and can’t remember how it tastes like…I must bake a batch soon too.Yours look really great, Liz.