Chocolate Lava Cakes
Chocolate Lava Cakes have become a holiday tradition. The rich chocolate, sweet berries, and individual servings make for an elegant dessert.
Molten Lava Cakes are perfect for Christmas, Valentine’s Day, or even an après-ski treat to take the chill off.

Why You Must Make
I’ve made nearly a dozen different chocolate lava cakes AKA molten lava cake recipes. Some in sugar-crusted ramekins, others in buttered and floured ramekins, but these from Pam Anderson were to be made in muffin tins filled with extra-large paper cupcake liners. A novel procedure that works!
- Everyone gets their own chocolate cake!
- The warm fudgy sauce in the middle pushes the over-the-top!
- They’re easier to remove than many other lava cakes since they’re baked in muffin tins with paper liners!

How to Make Molten Lava Cakes
Whether you’ve returned from a run down the slopes or are just enduring the frigid temperatures at home, a warm, comforting dessert is just what the doctor ordered. Though my family loves these enough to indulge on a 90º summer day! Here are some tips for making the perfect molten lava cakes.
- PRO-Tip: These molten lava cakes can be prepped ahead of time and popped in the fridge. Just bring them back to room temperature before baking and in minutes you will have a chocolate lovers’ dream before you!
- The key to a perfect chocolate lava cake recipe is timing. Bake too long and there’s no molten center. Too short and they will collapse. Both ends of the spectrum are still delectable, but watch for the perimeter to look firm and the center (less than the size of a quarter) to appear soft. This could take as little as 8 minutes or up to 12—all depending on the heat of your oven. Mine were perfectly cooked at 11 minutes.
- The rest of the recipe is easy. Melt the chocolate and butter, beat the eggs, sugar, and vanilla, then combine the two into one luscious batter. Make sure you use the best quality ingredients for the most delicious results.
- Divide and pour batter into either muffin tins or ramekins. Note that each lava cake is made with ½ cup of batter, so it may be too much for your muffin tin. Doubling the paper liners and spraying with non-stick cooking spray may help increase the capacity. Otherwise, use ramekins.
- I’ve made many other lava cake recipes without paper liners, just make sure to grease the ramekins well. I like lining the ramekins with a round of greased parchment to avoid any chance of sticking.
- Since the molten centers may not come up to 160º which will kill salmonella, you may want to use pasteurized eggs, especially when serving to children or the elderly.
- I only made half a batch (FYI, half a beaten egg is approximately 1½ tablespoons plus a ⅛ teaspoon) so I used ¾ cup capacity ramekins instead of a tin.
And here were the thoughtful comments from my family—brace yourself. “They complement the beer well.” “Thems good eats.” “Better than Arby’s.” Did you know Arby’s is now serving molten lava cakes? Me, either! So if you don’t want to get carryout lava cakes from Arby’s, I recommend making these in a couple of weeks for your Valentine or surprising your family any day of the year when they need to warm up from the inside out. This Chocolate Lava Cakes Recipe is a winner!

Frequently Asked Questions
The original molten lava cakes were created by chef Jean-Georges Vongerichten. Made with a brownie-like batter versus a typical cake batter, the insides remain liquid or lava-like, while the edges are cooked enough to hold in the molten center.
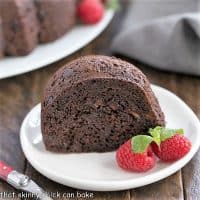
These individual chocolate cakes have thick fudgy centers which ooze out when cut into, resembling lava flowing out of a volcano.
Though the middle of these cakes is warm, the centers are not cooked up to the temperature at which salmonella is killed, or 150°. So it’s best not to serve these to the very young, very old, or anyone with a suppressed immune system.
PRO-Tip: Make sure to let these cool for a few minutes before inverting them onto a serving plate. If the edges don’t have time to cool and firm up, the lava will ooze out before your fork can break it open.
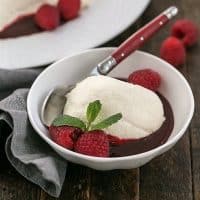
Once these babies are baked, carefully remove the paper liners and transfer them to serving plates. Garnish these chocolate lava cakes with a sprig of mint and a few sweet raspberries. A dollop of whipped cream would be marvelous, too.
Gently reheat leftovers in the microwave, but note that some of the lava may cook and solidify. They’ll still be mighty tasty!
You May Also Like
- Hot Chocolate Custard from Texanerin
- Raspberry Molten Lava Cakes from Pastry Chef Online
- White Chocolate Lava Cakes
- Chocolate Lava Cookies
- Chocolate Lava Cake
- Chocolate Mug Cake
- Plus, all my Best Chocolate Recipes
Molten Chocolate Lava Cakes Recipe
Decadent individual chocolate cakes with a fudgy, molten lava center!!!
Ingredients
- 1 cup butter
- 1 ⅓ cups chocolate chips or chopped semisweet chocolate
- 5 eggs
- ½ cup sugar
- Pinch of salt
- 4 teaspoons flour
- Fresh raspberries and mint to garnish, optional
Instructions
- Preheat oven to 450 degrees.
- Line 8 cups of a muffin tin* with extra-large paper liners. Coat with non-stick cooking spray like Pam.
- Gently melt the butter and chocolate in the microwave in a large heat-safe bowl. Use 30-second increments, stopping and stirring until all the chocolate is melted and smooth.
- With a hand mixer, beat eggs, sugar, and salt in another medium bowl until the sugar dissolves.
- Beat the egg mixture, then the flour, into chocolate.
- Divide batter among muffin cups.
- Bake until batter puffs but centers are not set, 8 to 10 minutes.
- Let stand in the tin for 5 minutes. Then carefully move each cake to a dessert plate, remove paper wrappers, and garnish with berries and mint if desired.
Notes
*The muffin tin should be able to accommodate ½ cup of batter or you can double up your muffin papers and add ½ cup of batter. I like to use ½-cup capacity ramekins with paper liners as an alternative.
Recipe adapted from Pam Anderson's Perfect Recipes for Having People Over.
Recommended Products
As an Amazon Associate and member of other affiliate programs, I earn from qualifying purchases.
Nutrition Information:
Yield:
8Serving Size:
1Amount Per Serving: Calories: 418Total Fat: 36gSaturated Fat: 22gTrans Fat: 1gUnsaturated Fat: 12gCholesterol: 177mgSodium: 247mgCarbohydrates: 23gFiber: 2gSugar: 19gProtein: 6g
Thatskinnychickcanbake.com occasionally offers nutritional information for recipes contained on this site. This information is provided as a courtesy and is an estimate only. This information comes from online calculators. Although thatskinnychickcanbake.com attempts to provide accurate nutritional information, these figures are only estimates. Varying factors such as product types or brands purchased can change the nutritional information in any given recipe. Also, many recipes on thatskinnychickcanbake.com recommend toppings, which may or may not be listed as optional and nutritional information for these added toppings is not listed. Other factors may change the nutritional information such as when the salt amount is listed “to taste,” it is not calculated into the recipe as the amount will vary. Also, different online calculators can provide different results. To obtain the most accurate representation of the nutritional information in any given recipe, you should calculate the nutritional information with the actual ingredients used in your recipe. You are solely responsible for ensuring that any nutritional information obtained is accurate.


46 Comments on “Chocolate Lava Cakes”
I love chocolate lava cakes, so easy to make, and boy does it pack the Wow-punch. I used to make them all the time, but I haven’t made them in years.
Hiya
What are the dimensions of the muffin tins/liners that you used?
made them it like in the recipe using muffin liners inside a muffin/cupcake baking tray cooking for 8min at 218C but the lava in the middle had cooked!
The taste was still nice and everyone loved them but I need the centre to be runny as I will be baking them for an event next month.
Please help!
Thank you
Oh, I’m sorry about that, Deborah! The muffin tin should have 1/2-capacity cups. I have used ramekins, too, if you happen to have 1/2 cup ramekins. Yes, you definitely want to have a little lava!! I’m going to update the recipe card with this info.
Oh, my kids loved it!! Will add it to our holiday menu! Thanks for the recipe!
Is it wrong to eat these for breakfast?
So good! Loved them!!
Wow – I can’t think of a more beautiful sight than flowing chocolate from a decadent chocolate cake! It looks so fluffy – just gorgeous.
OMG this lava cake is a keeper! Making for Valentine’s
This is the perfect sweet treat for Valentine’s Day! That molten center is heavenly!
i just made them! They are delicious! Just doubled the amount of chocolate and flour…Thank you very much!
So glad they worked so well for you, Anastasia! Hope you have a terrific weekend!
Hi Liz! I made these for my friend’s birthday tonight
and they were so easy and WONDERFUL! Perfectly
melty and such a deep chocolate flavor. I served them
with vanilla ice cream.
(one note the instructions mention salt, but there is no
salt listed on ingredients, so I used 1/2 teaspoon)
Love you!
Can you be my proofreader???? I’m so glad these were a hit. I’ve edited to add a “pinch” of salt 🙂 xoxo
P.S. We need to schedule a girls’ trip!!!
Lizzy,
I need to try lava cakes at home. My mouth is watering.
Annamaria
Lava cakes are on my list of must make baking recipes! They are so gorgeous with that hidden chocolate that just gushes out upon the first bite.
Molten lava cakes are my favourite, your recipe looks perfect 😀
Cheers
Choc Chip Uru
Love the idea of making a small batch and even more I love the method of using muffin tins for individual servings…they look so beautiful and special. We could easily ‘sofa it’ together with these! 😉
It rains all day, It’s cold! All I want is chocolate! Your cake is ideal for me! Love the idea that these lava cakes can be prepped ahead of time and keep it in the fridge 🙂
What a fun party! And as always, I feel like I gained 5 pounds reading this post. Love your method of using the muffin wrappers 🙂
I love molten lava cakes! They always remind me of when I first started dating my husband. Yours looks perfect! Drooling over that gorgeous oozing chocolate!
I’ve never made lava cakes, but I’m intrigued with the process. I’ll have to try soon 🙂
Ahhhh, we were on the same lines yesterday. I was freezing and all floppy after yoga yesterday and starving and so squidgy warm chocolate cakes were the only thing to do that’s so quick and nourishing! Yours look totally tempting. Mine would have been better with raspberries though… and I heard it was National Chocolate Cake Day! Love how in the US you have celebrations all the time. Cheers, Liz!
You truly are a tremendously gifted gourmet cook / baker / blogger lady, Liz! The timing on these chocolate babies do seem a bit tricky…And I’d take one of yours over Arby’s any day of the week! =)
I make these fairy often. Not this recipe though! Everyone loves them and it is so nice to pop them in the oven after the dishes are done. Easy eating and easy clean up! Valentine’s Day is coming!
Chocolate Lave Cakes are one of my all-time favorite desserts. I’m saving this to make for Valentines for my chocoholic husband 🙂
Liz, don’t you just love Pam. No one handles meals for large crowds better and the idea to make these in paper cups is brilliant. Your cakes are stunning and I’m sure would be the world’s greatest Valentine’s Day treat. Thank you for creating the perfect ending for our progressive meal!!
These look delightful!!
I looooooooove lava cakes! This one looks flawless-so chocolatey and rich and yum!
drooling over here!!!
Chocolate lava cakes are one of my most favorite desserts ever! I can’t imagine an occasion for which they would not be a perfect ending. Yum!
I loved reading your family’s comments! 😉 I have neither made nor eaten a molten lava cake, and I think that needs to be remedied. 🙂
You can never go wrong with a classic chocolate lava cake. These look so delicious Liz!
Oh this looks good! I’d like a couple of the ‘peno appys too:@)
I remember the first time I had chocolate lava cake – it was such a treat! What a perfect dessert to end our Progressive dinner!
Oh that molten center looks divine, love these cakes Liz!
Liz, this looks wonderful…and I love chocolate! What a delicious dessert to treat your family with sweet love…thanks for sharing this recipe!
Perfect! What a great dessert for Valentine’s Day!!!
We love getting lava cakes when we’re eating out, but I haven’t tried them at home yet. I really need to bake these soon.
There is something about a lava cake that I just cannot resist!
Chocolate lava is my favorite, especially with loads of chocolate on the inside. I’m drooling over this, Liz.
Better than Arby’s?! High praise–lol! These little guys are adorable, and perfect for warming up. What a great after-ski (or in my case, after sitting on the couch looking out the window watching other people ski) dessert!
This is probably my all time favorite dessert. I wish I could have one every day. I don’t know how good that would be for my body but it would do my soul a whole lot of good.
If there is a sight more beautiful than snow capped mountains, it is the sight of a well made chocolate Lava cake! Your cake looks fantastic, Liz.
drooling!
Love the oozing middles!
These little cakes look so decadent and tempting! Love the combination of chocolate and raspberries so I’d be all over these. Lava cakes are always a favorite of mine. There’s nothing quite like sinking your fork into tender cake to reveal smooth, warm chocolate inside. Lovely!
I adore lava cakes. I wish real volcanoes would spew chocolate sauce…