Homemade Twix Bars
These outrageously delicious Homemade Twix Bars have a shortbread crust, a decadent layer of caramel, and chocolate glaze. The perfect way to satisfy your sweet tooth!
If you’re a Twix Bar fan, you’ll love having these gooey caramel bars for an unforgettable indulgence.
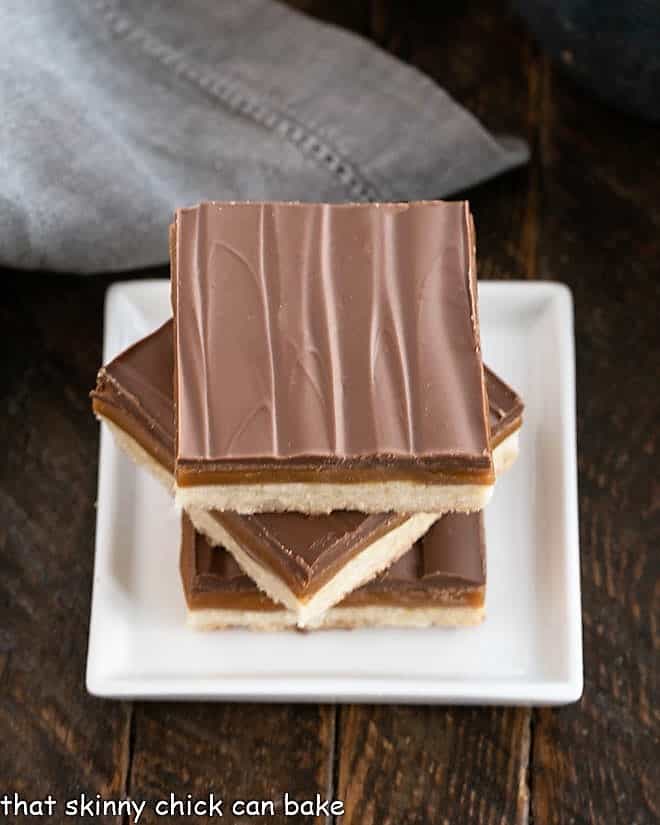
Why You Must Make
- Being someone who could just pour caramel sauce right into my mouth this layered caramel chocolate bar recipe was a no-brainer when it was time to find the perfect recipe for our annual cookie exchange.
- None of the steps in this recipe are difficult. The biggest challenge is cutting them into neat bars since the shortbread crust tends to crumble. But this only seems to be a problem when you need to take photos, not if you need to eat them!
- There’s the buttery shortbread base, the sweet and gooey caramel center, and a milk chocolate topping. Three textures, three flavors, and two thumbs up!
Ingredient Notes
- Kitchen Staples – Sugar, Flour, Real Vanilla Extract
- Butter – Cold butter will make a better shortbread crust. Salted butter is fine.
- Werther’s Original Chewy Caramels – I prefer these over Kraft caramels, unwrapped of course!
- Heavy Cream – Will help make a rich caramel layer
- Milk Chocolate – I used Ghirardelli Bars but chocolate chips are an alternative
- Vegetable Shortening – optional, I used to make the chocolate topping more glossy
How to Make
There are three layers in these bars, so three main steps.
- First, using either a pastry blender or a food processor, make the shortbread crust.
- Press the crust onto the bottom of the baking pan and bake. PRO-Tip: Line your baking pan with nonstick foil for easy removal from the pan for slicing (use the foil as a sling) and to prevent the caramel from sticking to the pan.
- Next, melt the unwrapped caramels with the cream and spread over the cooled crust. Chill.
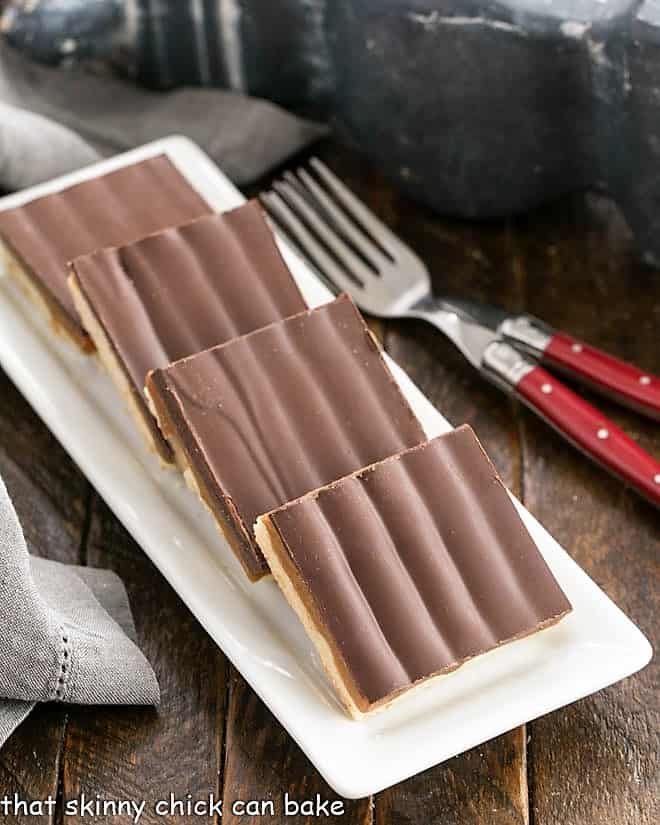
- Finally, melt the chocolate and shortening and spread over the chilled caramel layer. Use a frosting tool to make a striated design across the top of the chocolate before it cools, if desired.
- Chill bars until the topping is set. Slice and serve.
Recipe Tips
- Lining the baking pan with non-stick foil minimizes the sticking that comes from the gooey caramel layer. It also helps you to remove the bars from the pan to a cutting board to slice them into squares.
- Using a pastry blender to make the crust layer helps disperse small pieces of butter throughout the dough. This helps make a more tender crust.
- Using bagged caramels for the filling helps avoid having to make caramel from scratch. I recommend using Werther’s soft caramels.
- The chocolate layer can be smoothed on with a small offset spatula. I used a (Amazon affiliate link) cake decorating tool to make the lines across the top for some visual interest.
- Chill before cutting so the caramel has a chance to solidify. I like using a hot dry knife to cleanly cut through the chocolate and the caramel. Wipe clean between slices if the knife gets dirty.
Frequently Asked Questions
If you’re not familiar with Twix Bars, they came into existence in 1967 in the United Kingdom and made their way to the U.S. in 1979. Produced by Mars, Inc. the original Twix was a biscuit topped with caramel and milk chocolate. Now there are various flavor combinations along with different sizes and packaging options.
Caramel Bars offer a challenge when storing since the gooey caramel can ooze a bit once they’re cut. I recommend storing these in a single layer in an airtight container in the refrigerator.
They can be frozen for up to 2 months, but the chocolate layer may not be pristine when they’re defrosted. Defrost in the refrigerator in the same container in which they were frozen. Note: once the bars are frozen, they can be stacked with a layer of parchment paper between the bars.
You May Also Like:
- Chocolate Caramel Twix Cheesecake
- Twix Cheesecake Bars
- Chocolate Caramel Shortbread Cookies
- Double Chocolate Twix Cookies
- Milky Way Brownies
- Plus more of my Best Cookie Recipes
This recipe was first shared in January 2013. Photos and text were updated in 2021.

Homemade Twix Bars
Decadent shortbread bars topped with caramel and milk chocolate.
Ingredients
Shortbread layer:
- 2 sticks cold butter, cut into small pieces
- ½ cup sugar
- 2 teaspoons vanilla
- 2 cups flour
Caramel layer:
- 20 ounces Werther's Original Chewy caramels, unwrapped of course!
- 3 tablespoons heavy cream
Chocolate layer:
- 18 ounces milk chocolate, chopped (I used Ghirardelli Bars but chocolate chips are an alternative)
- 1 tablespoon vegetable shortening (optional, I use to make the topping more glossy)
Instructions
- For the crust: Preheat oven to 350°. Line 9" x 13" pan with nonstick foil. Set aside.
- Using a pastry blender cut butter into the sugar. Use fingers to break up the butter, till the mixture resembles cornmeal.
- Add vanilla. Add the flour.
- Mix till flour is incorporated. The mixture will be crumbly. Alternatively, you can mix in the food processor.
- Press it evenly into the pan. Lightly flouring your fingertips will help with any sticking.
- Prick the crust all over with a fork.
- Bake 15 minutes until the crust is lightly golden brown on top and the edges are deeper golden brown. Set it aside to cool completely.
- For the caramel layer: Melt the caramel and cream over low heat in a small saucepan. (or use the microwave, stopping and stirring at 30-60 second intervals till smooth and melted). Pour the caramel over the cooled crust and set in the refrigerator for 30 minutes to chill and firm up.
- For the Chocolate Layer: Melt the chocolate and shortening by microwaving using 30-second increments, stopping and stirring till melted and smooth. Spread over caramel with an offset spatula. I also used a plastic frosting tool to make optional striations while the chocolate was warm.
- Let cool before cutting. Store in an airtight container in the refrigerator to minimize the caramel oozing.
Notes
You can also use Kraft caramels, but I prefer the taste of Werther's.
I've tested a number of crusts, but they all seem to crumble a bit when the bars are sliced. They will still taste amazing!
The caramel will ooze, so these are best stored in the refrigerator. Cut into squares right before serving if you want the cleanest slices.
Nutrition Information:
Yield:
24Serving Size:
1 barAmount Per Serving: Calories: 338Total Fat: 17gSaturated Fat: 10gTrans Fat: 0gUnsaturated Fat: 6gCholesterol: 29mgSodium: 136mgCarbohydrates: 43gFiber: 1gSugar: 31gProtein: 4g




64 Comments on “Homemade Twix Bars”
How about measurements in gm or even oz that any weighing scale in the rest of the world can understand??
I wish I had time to make 1000+ recipes over and use metric measurements.
These homemade Twix bars look dangerously delicious. Fun recipe for the Easter holiday- as they kids can’t have all of the fun.
Even though I personally prefer bars loaded with nuts, Twix bars are my favourite. There’s something in the combo of shortbread, caramel, and milk chocolate you cannot resist. I’ve never made them myself though so thank you for the recipe!
How did you know we were craving these? You have these perfectly clean cut on a plate. If you need any help polishing these off, let us know. We will be right over!
Love the icing detail! These would be a perfect treat for the Super Bowl today:@)
My husband love TWIX. I am saving this recipe for his birthday 🙂
I agree that these are so much better than twix bars! Delicious!
You cant imagine how much I loved this post,twix being my favourite
Liz..you cant imagine how much I loved this post dear,twix is my favourite chocolate..
Seriously delicious!!
These look soooooo delicious! I’ll be making them for dessert tonight for sure!
These look so perfect, Liz! I’m not even much of a shortbread fan, but that looks incredibly delicious too. Well done! And thank you for linking up to the Weekend Kitchen Party…I hope you’ll come back and link up another recipe this weekend.
Thanks for sharing these on Foodie Friends Friday.. I love twix bars :). Hope you will join us again this week.
This looks really good! Thanks for sharing on Foodie Friends Friday! I’m a new blogger trying to get more readers and followers. Check out me blog and let me know what you think can make it better! http://rediscovermom.blogspot.com/
These bars look exactly like Twix bars! I loooove Twix bars, really great recipe!
Looks AMAZING!!! Makes me wish I didn’t already just bake something today, because I’m having baking envy!!! And, I loooove the name of your site.
Thank you so much for linking up at City of Motherly Love’s Linky Party!
I’ve gotta thing for twix. Found you at Country Cook Weekend Potluck!
Such beautiful pictures. Pinning this!
Totally drooling over these bars. They look amazing!
Homemade twix sounds like something I need to try!! These look awesome!
How in the heck did I miss one of my favorite candy bars? Look sinfully wonderful, Liz!
Twix are one of my favorites because of that shortbread layer. Oh, these would be dangerous to leave around me! 🙂
Oh, these are so much prettier than the millionaires shortbread I made in December! You work magic in the kitchen, Liz. I love Twix bars and am beyond thrilled that I can make them at home with this wonderful recipe.
Just looking at these creates such a craving!
“Two Sweetie Pies” <—- love this!! Homemade Twix! Now that's a treat!
These look so perfect and yummy!! 🙂
this is absolutely one of my favorite treats! I remember someone selling them at a bake sale and they were gone in no time!
Liz…that recipe exchange idea is a good one! And what a great choice you made. I love Twix bars and this dessert version looks even better than the original thing! : )
Shortbread, caramel, and chocolate…Liz, this is sinfully decadent!
Just to let you know that your link to Food on Friday: Pork was featured in my Need Some Inspiration? Series today. Have a nice week.
Those look so good! Twix where always my favorite 🙂
I think I just became obsessed!
Lizzy, these bars look like the sort that I can’t stop munching on. Very dangerous indeed!
These bars look heavenly my friend 🙂
Cheers
Choc Chip Uru
Twix bars are one of my favorites! These look delicious.
Oh these look good. I think maybe a Valentine’s Day treat for my man. He loves Twix.
You had me at shortbread. Seriously. I could go for one of these with a scoop of ice cream! Thank you for sharing this it will be soothing my sweet tooth one day very soon. 🙂
My, my, my, simply my! Chocolate, caramel and buttery shortbread what’s not to love?
OMG this is awesome, if not just plain genius. I will be bookmarking this one!
Lizzy-this wa so much fun to be a SWEETIE PIE with you!! These bars look beyond perfect!!!
This is quite possibly the most exciting thing I’ve seen all Monday =)
These look perfect… better than the packaged twix bars for sure! 🙂
I may seriously dream about these tonight. So yummy.
Great bar cookie recipe- it’s going on the list for next year’s press box baking-for sure;-)
My friend Liz.
These bars with these layers of caramel and chocolate are delicious. The cover was beautiful with ornaments striations. I love it. Kisses from gina
seriously, are you trying to hurt me! I mean i just got through making cookies and now I MUST make these! Wow! Like a dream come true. Twix was and still is my favorite candy bar
Very cool bars and they really look like a side cut of a Twix bar. This one would be very bad for the waist line 😉
These look and sound fantastic! Twix are one of my favorite cady bars. Delicious!
Wow, these are very tempting:). My husband love Twix Bars so he will be veeery glad!
I’m going to have to try these soon. Yum!
Wow!! these Twix bars are amazing! I just happen to have a huge milk chocolate bar, which would be a perfect use for all of that chocolate!
Thanks Lizzy and Danielle for sharing this delight!
Oh my!! This would not be good in my house haha! I love Twix they are like one of my biggest weaknesses!
Oh Lizzy ! Your Twix bars look really good ! Just love Twix 😀 I have this recipe of Twix bars that I’ve been wanting to bake since forever but haven’t got around on making it yet 😛
I need these in my life now. This is why resolutions in January are a bad idea 🙂
This combination of flavors is a perennial favorite, they look yummy! Did you comb the surface?
Yes, Paula, I followed Danielle’s lead and used my cake comb on the melted chocolate. Not perfect, but fun to add another dimension 🙂
Oh my gosh, look at that caramel. You chose one of Dudette’s most favorite chocolate bars, you know. She’s not only taken on the chocolate love, but pulled in caramel as well. I’ll take that one right on top with the most caramel in there. 🙂
I could do these and the kids would love–so would I. Yummy!
Ugh, are you doing a series on snack food? 🙁
Is that a bad thing?? 😀 I’m not sure why we even have regular food. Snacks all day, I say.
Liz, this is nothing short of delightful. For some reason I’m fixated on the caramel. I’d love to sink my teeth into it!!!
Love these bars, Liz! Wish I had one right now for a snack before bed!