Raspberry Danish Braid
Bea Ojakangas, the contributing baker for this exquisite Raspberry Danish Braid, reported that this is how modern danish is made in Denmark.
When one of my girlfriends said this Danish Pastry may be the best thing I’ve ever baked, I knew I’d hit a home run!

Why You Must Make
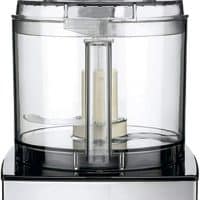
- This cheater version of a laminated dough was right up my alley. Made in the food processor, then rolled and folded like puff pastry, this method avoided the messy layering of butter but produced similar results.
- Bea Ojakangas, the contributing baker for this exquisite Raspberry Danish Braid in Baking with Julia, relayed that homemade danish is made this way in Denmark.
- This danish pastry recipe is less work than a more traditional version but still produces a buttery, flaky dough.
I filled this lovely pastry dough with vanilla cream and gelled raspberries, then crisscrossed strips of dough resulting in a stunning braid. Waiting for this to cool for a sample was pure torture, but totally worth all the steps…including the overnight resting period of the dough. I think you will agree.

Ingredient Notes
- Kitchen Staples – Sugar, Salt, Flour, Cold Butter, Room Temperature Eggs, Egg Yolk, Cornstarch
- Warm Water – 105-115° F, to proof the yeast.
- Dry Active Yeast – 2 ½ teaspoons; slightly more than one packet.
- Fresh Raspberries – Crushed
- Fresh Lemon Juice – Preferred over bottled juice
- Heavy Cream – 36% Butterfat
- Vanilla Extract – Never use artificially flavored vanilla.

How to make your cuts: Repeat on the second side, then start at one end folding a strip over the filling. Repeat with the corresponding strip on the other side. Repeat until all strips are folded.
Recipe Tips
- I should have known that the microwave instructions for the vanilla cream and raspberry filling were outdated. I have quite the powerhouse microwave and my raspberry concoction boiled out of its measuring cup at the 7-minute mark. I’m certain I’d still be cleaning if I went the full 10 minutes.
- I was more cautious with the instructions for the cream filling, and actually enjoyed only having Pyrex measuring cups to clean instead of pots and pans. But the dough is the real star. Feel free to fill this Danish recipe with whatever tickles your fancy.
- The rolling and folding of the dough makes layers, almost like puff pastry.
- Other berries will also make delicious versions of this tasty Danish recipe!
- The braiding process is quite simple. It’s definitely easier than plaiting a 3-stranded bread! Utilize the photo above to see how to make your cuts.
- After cutting each side, start at one end and fold one strip over the filling, followed by the corresponding strip on the other side. Continue going back and forth, alternating folding one side, then the other, until all the strips have been folded and the filling is covered.
I took this braid over to my neighbor’s house to share with a group of friends. There were oohs and ahs when I set it on the kitchen counter. Then the ultimate compliment: I was told that this beautiful braid tasted as good as it looked and was one of the BEST things I’ve ever baked!!! Now I can see why this is Bea’s most requested recipe.

Frequently Asked Questions
These pastries did not originate in Denmark but do have a connection. In the 1850s, the pastry makers in Austria went on strike, so in response, they went to Denmark where their baked goods are called Viennese (wienerbrød) according to Quora. But known as danishes here in the U.S.
A Danish pastry is a sweet, multilayered, laminated pastry developed by Viennese bakers in Austria. As mentioned above, it was brought to Denmark by Austrian bakers, where it became known as “danish.”
You May Also Like
- An apricot version of this Danish can be viewed here.
- You might also enjoy my Cream Cheese Danishes and my Braided Cinnamon Danish!
- Find more of the best breakfast recipes and brunch food in my Recipe Index!
Raspberry Danish Braid
Tender dough filled with raspberry and cream cheese. Plus how to make a cheater laminated dough!
Ingredients
Danish Dough (Makes enough for 2 danishes/2 pounds of dough):
- ¼ cup warm water (105-115 degrees F)
- 2 ½ teaspoons active dry yeast
- ½ cup milk at room temperature
- 1 large egg at room temperature
- ¼ cup sugar
- 1 teaspoon salt
- 2 ½ cups all purpose flour
- 8 ounces unsalted cold butter
- Extra flour to prevent sticking
Fresh Berry Jam Filling:
- 2 cups crushed fresh raspberries
- 1 cup sugar
- 1-2 tablespoons fresh lemon juice
Confectioner's Cream:
- 1 cup heavy cream
- 1 ½ tablespoons cornstarch
- 2 tablespoons sugar
- 1 egg yolk
- 1 teaspoon vanilla
Instructions
- Pour the water into a bowl. Sprinkle the dried yeast on top of it and gently swirl until mixed through.
- Add the milk, egg, sugar, and salt and whisk to mix, and set aside.
- In a food processor combine the flour and cut up butter and pulse gently until the butter has been broken down into about half an inch. The butter must stay visible to make the pastry flaky and layered.
- Empty the flour mixture into the wet bowl and gently mix through with a spatula until well combined. Cover the bowl with plastic wrap and let rest in the fridge overnight.
- Divide the dough in half. Use half to make one danish and freeze the other half for another time.
- Flour a cool work surface and dump the dough onto it. Roughly shape the dough into a square. Sprinkle flour and roll the dough into a 16-inch square. Fold the dough in thirds and turn it so the folded closed side is to your left.
- Roll the dough out again to 10 x 24 inches. Remember to use the flour! Fold the dough into thirds again. Turn it so that the closed side is on your left again.
- Roll it into a 20-inch square and fold it again into thirds like a brochure. Roll the dough into a rectangle 10 x 24 and fold it in thirds again.
- Wrap the dough in plastic and chill for about 30 minutes. The dough is now ready to be rolled and shaped for pastries. It can be kept in the fridge for 4 days sealed in plastic or frozen for 1 month.
- For the berry filling, stir the berries and sugar together in a microwave-safe bowl. Cook for 10 minutes on full power. Stir and cook for 5-8 minutes until most of the liquid has been absorbed and the filling looks glossy. Mine took less time. Cook time will vary depending on the strength of your microwave. Stir in lemon juice and cool to room temperature before using it.
- For the cream filling, whisk together cream, cornstarch, and sugar in a large microwave-safe bowl. Microwave on full power for about 1 minute (time will vary depending on the strength of your microwave). Stir and cook for 2-3 more minutes till the mixture boils and thickens a bit. Watch carefully as all microwaves cook differently.
- Whisk together egg yolk and vanilla. Temper the egg mixture by slowly whisking in a little of the hot cream mixture, then slowly add the yolk mixture to the cream, whisking constantly.
- Microwave for 30 seconds more, then stir. The mixture should be thick like lemon curd. Press some plastic wrap over the surface and cool to room temperature.
- Spread some of the berry filling over the middle of the danish, then top with some of the cream filling. You may not need to use all the fillings.
- Slice slits along both sides of the filling that you'll fold over the middle. See photo above.
- Preheat oven to 400° and line a baking sheet with parchment.
- Carefully transfer the danish to the pan. Cover with a with a kitchen towel and let rise for about 30 minutes, they will look puffy but not double in size.
- Bake for 18-20 minutes until lightly browned. Let cool before serving.
Notes
Adapted from Baking with Julia.
Tastes best on the day it is baked.
Recommended Products
As an Amazon Associate and member of other affiliate programs, I earn from qualifying purchases.

Nutrition Information:
Yield:
8Serving Size:
1Amount Per Serving: Calories: 688Total Fat: 36gSaturated Fat: 22gTrans Fat: 1gUnsaturated Fat: 11gCholesterol: 142mgSodium: 475mgCarbohydrates: 84gFiber: 4gSugar: 37gProtein: 9g


51 Comments on “Raspberry Danish Braid”
This is so lovely and delicious! So perfect for any occassion!
I was wondering if you do a cinnamon pecan tea ring my mother inlaw was Danish and my hubby grew up eating them ..his mother and grandmother made them I don’t have her recipe.i was wondering if you might have one I could try ,well hers was all made from scratch .I just want to suprises my husband she passed away about 25 yrs ago …..thank you
I wish I did, Beverly. If I run across anything that sounds similar, I’ll share a link with you. For years I tried to recreate an apple kuchen that was made by my father-in-law’s grandmother. Same thing—no written recipe!
this is a work of art !
Hi Liz,
This looks amazing! I actually just made an apricot braid today but this looks even better =)
I’m trying to view the recipe but the link isn’t working for me. Do you have it written on another page, or a direct link? I appreciate your help!
Uh, oh! You’re right, she took the recipe off her site. I’ll look around, Yvonne, and see if I can find it for you.
Here’s a link to her pastry:http://foodnessgracious.com/2012/08/apricot-danish-pastry-braid-2/ (http://foodnessgracious.com/2012/08/apricot-danish-pastry-braid-2/)
I can’t find the fillings which included a microwave jam and microwave pastry cream. I will try to type them up if I can find some time over the next couple of days. Thanks so much for letting me know the link was broken!
G’day Liz, your photo and recipe looks so delicious, true!
WISH could come through the screen and try one of these right now too!
Cheers! Joanne
Viewed as part of Nancy’s Your Best Recipes Oct 2013
Lizzy,
I don’t know how you waited for this lovely Danish to cool before eating. Danish is something I’d love to make but just never got around to.
Annamaria
Beautiful braid and great pictures!
Danish looks stunning! I love the pictures!
Glorious it is! Your danish is stunning – your almonds are so perfectly placed. I went with an apple filling, delicious as it was, I’m jealous of the beautiful red color of your raspberry version. Nicely done as usual.
The braids are perfect. A quick sweet dough recipe if very handy when time is short.
You make the most wonderful desserts. I love everything about this with the vanilla crème and raspberries. I could pop those in a gluten-free pastry and be in heaven.
Beautiful!! This was such a great recipe!
Beautiful, Liz. My microwave’s power is kind of underwhelming so the 10 minutes worked for me thankfully!
So beautiful, Liz. In college I made one of these with apricot. It is fun to see how pretty they come out. But yours is prettier than I remember mine being! Now I’m checkin’ out the dough!
Liz, I always gasp in delight when I visit your blog. This braided bread is beautiful. Thanks for the photo where you show how the dough looked right before “braiding” it. I would never have figured out how you shaped the loaf without it. You have the luckiest friends/family/neighbours since they get to eat everything you make!
Wow this braid looks amazing! Love the filling and I have to make this pastry, I cannot make a puff pastry to save my life.
expert braid work–that’s beautiful! I knew that microwave pastry cream sounded a little scary. if I do try to make it one day, i’ll be sure to watch my times.
Agreed – this cheater dough was a win. I wonder how it would work on croissants… Hmmmm , I may have to test that soon!
Raspberry = 🙂
it looks yummy!
Liz, raspberries and pastry cream sound like two delicious fillings for this very versatile and wonderful recipe – glad that you also enjoyed this somewhat “easier” version of the lamintaed dough!
Have a great Wednesday!
The braid looks absolutely gorgeous! I wish I’m that lucky neighbour of yours!
I was just getting ready to turn off the light to go to sleep and then I saw this. Now you’ve got me so hungry I feel like I need to eat something. Wow you did a beautiful job on this Liz. I bet it doesn’t last long in your house.
Absolutely divine looking! Your filling sounds delicious!
This is almost too beautiful to slice it open! Well done, Liz!
Ooh! I have to try this method Liz! I’m all about an easier version of laminated dough. Thank you for sharing. Just a gorgeous braid!
it not only looks beautiful but so darn delicious!
I like the idea of this dough too! I can see why it was so difficult to wait…very tempting and what a presentation!
What a beautiful braid, Liz. I once made one like that (not as beautiful – not even close! LOL) for my very first low-carb cookbook, Splendid Low-Carbing. Now that I can’t use gluten for the cookbooks, it’s next to impossible, it seems at the moment. 🙁
We eat with our eyes first 🙂 Your Danish Braid looks very festive – I love all the reds and the beautifully arranged almonds.
So beautiful! I’d ooh and aah too. 🙂
Wow, that is a stunning pastry!!! Sorry to hear about the raspberry filling in the microwave – it looks like in the end it turned out beautifully though 🙂 Raspberries with cream are the perfect combination!
What a gorgeous, work-worthy Danish braid, Liz! I am so sharing it!
There is no doubt in my mind that this braid tastes as good as it looks, Liz. I must check out the process. It sounds like something even I can do, lol…
Thanks for sharing, Liz…
What a fantastic find, Liz! I have Dorie’s book but wouldn’t have thought this pastry is so easy and gorgeous! You’ve done it again.
Now that’s a beautiful thing!!! It looks absolutely perfect and delicious!
It beautiful, and a perfect pastry and braid. Love it.
Liz, Your danish braid looks just perfect. And the filling sounds so yummy! I am afraid if I made one it wouldn’t look nearly as nice as yours.
Raspberries and pastry cream are a perfect combination!
Your raspberry braid is a stunner! Raspberry and vanilla do seem to be perfect compliments for the bread 🙂
Liz, Your braiding on this danish is beautiful. I’m inspired and pinning.
This looks so professional Liz! Raspberries and vanilla cream, how delicious. I do love that simplified laminated dough, that’s one way I don’t mind cheating. 🙂
This is gorgeous! Your presentations are always lovely.
Your braid is so pretty, I love the raspberry filling!
This looks SO delicious…and gorgeous as always. Raspberry/cheese danish is one of my all-time favorite pastries. Yummy!
Ah Lizzy this look absolutely beautiful!!
Liz, this is so beautiful, I would have a hard time cutting into it…but, I probably could be convinced. Thanks for the directions on making this dough in an easier way.
Yours is beautiful Liz! Nicely done!
Oh my, that looks amazing. And I love that the dough is easier to make than authentic puff pastry. The only thing that’s kept me from trying it is the amount of work involved. I agree with your friends, it’s glorious.
That is beautiful Liz! Love the cream sauce. Had to chuckle about your microwave, we call mine “the ubberwave”:@)