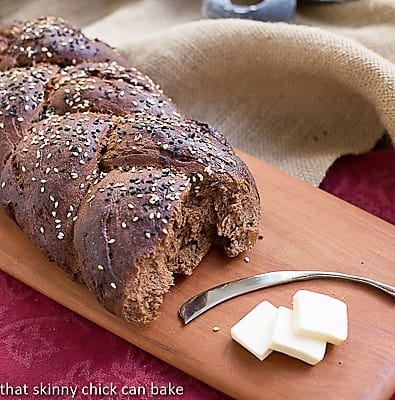
Pumpernickel Loaves
Unusual ingredients and techniques resulted in tasty Pumpernickel Loaves. Dark, rich, and chewy, the slices were delicious smeared in butter.
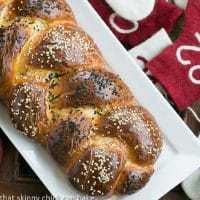
If you love to make yeast bread, this beautiful, braided Pumpernickel Bread to your baking list.

Homemade Pumpernickel Bread
Looking at the ingredient list for pumpernickel loaves made me wonder who the heck came up with this combination! Prune butter, espresso, molasses, and unsweetened chocolate? Prunes, apparently, are a natural preservative, plus all four help give the rich, dark color of the classic pumpernickel bread.
And as Lauren Groveman, the contributing baker for this week’s Baking with Julia recipe stated, they also provide a dimension of flavor. And then hanging the loaves in a sling for the last rise? Definitely an odd bread-making technique. This was going to get interesting.

Tips for Making an Authentic Pumpernickel Bread
- I made the pumpernickel bread dough as directed, using my professional KitchenAid for the kneading. I left out the caraway, hoping that the hubby would at least sample more than one bite.
- During the first of three proofing periods, I hunted down the video of the PBS episode where Lauren demonstrates her method to Julia. It helped immensely.
- Make sure to hunt down prune butter plus have molasses, espresso powder, and unsweetened chocolate on hand along with the caraway if you choose to use it.
- I made one loaf her way and braided the second.
- Curious about the sling? View the video on how to shape and bake these loaves here.
The Verdict
This pumpernickel bread recipe tasted lovely with a creamy pat of butter. There’s nothing more delicious in my book. I don’t think I would have ever baked this variety of bread if not for the Tuesdays with Dorie group. It was good and tasted exactly as pumpernickel should, but it’s not a bread variety I ever crave. And if you’re wondering, Bill just looked at the bread but didn’t take the bait.
Check out more of my Homemade Bread Recipes.
Pumpernickel Loaves
Rich, delicious Pumpernickel Loaves make a tasty breakfast, sandwich or dinner side!
Ingredients
- 3 to 4 tablespoons melted butter, for greasing
- 2 cups plain yogurt, at room temperature or, as a substitute, use tepid water (warm to the touch)
- 1 stick unsalted butter, softened and cut into small cubes
- 1/4 cup solid vegetable shortening, at room temperature
- 1/2 cup prune lekvar (also called prune butter: available in most well-stocked supermarkets with jams and preserves)
- 1/4 cup molasses
- 1 tablespoon instant espresso powder
- 1 cup boiling water
- 2 1/2 squares (2 1/2 ounces) unsweetened chocolate, broken
- 2 tablespoons ground caraway seeds
- 1 1/2 tablespoon whole caraway seeds
- 1 tablespoon fine table salt
- 2 1/2 packages active dry yeast
- 1/2 cup warm water
- Pinch of sugar
- 3 1/2 cups coarse rye meal (if unavailable, substitute medium rye flour)
- Up to 6 cups high gluten bread flour, including flour for dusting and shaping
- Glaze: 1 egg white beaten with 1 teaspoon water
- Topping: sesame seeds and/or caraway seeds (optional)
- Cornmeal (medium ground), for bakers peel
Instructions
- Brush an 8-quart bowl with melted butter and set aside to rise dough. Take out your pastry scraper, another large mixing bowl and a wooden spoon.
- In a large mixing bowl, combine the yogurt, cubed butter, shortening, lekvar and molasses. Dissolve instant espresso in 1 cup boiling water and pour into a small, heavy-bottomed saucepan.
- Add broken chocolate and melt chocolate in espresso over very low heat until smooth, stirring frequently. Add to mixing bowl with powdered and whole caraway seeds and salt. Dissolve yeast in 1/2 cup warm water with a pinch of sugar until creamy and pour into mixing bowl along with the rye meal. Stir to combine well.
- Using a wooden spoon, briskly stir in enough bread flour, 1/2 to 1 cup at a time until you create a mass that’s not easily stirred, but not dry. Turn the mass out onto a floured wooden board and knead until smooth and elastic, adding only as much flour as necessary to prevent dough from sticking to your work surface and hands.
- At the beginning of the kneading process, this dough will feel quite “pasty” because of the rye flour. As always, use a pastry scraper while kneading to scrape the dough off the board cleanly as you continue to knead in a sufficient amount of flour.
- When the dough is smooth and elastic, place it in the buttered rising bowl. Cover bowl with buttered plastic wrap and a clean kitchen towel. Let rise in a draft-free spot until doubled in bulk, about 2 1/2 hours.
- Punch down dough with several swift swats from the back of your hand to deflate the dough totally. Turn over dough, cover, and let rise again for 1 1/2 hours.
- Turn out fully risen dough onto a lightly floured board and use the blade of your pastry scraper to divide the dough in half. Work with half the dough at a time, keeping the other half covered.
- Lay two clean kitchen towels on your counter and sprinkle them with bread flour. Roll dough half into a 7×10-inch rectangle. Starting at the short end farthest from you, roll dough toward you, pinching to seal as you go.
- *Pinch to seal the ends and tuck under to attach to the bottom seam. Rotate and plump dough to finish shaping and place shaped loaf (seam side up) diagonally on a prepared towel.
- Form a sling by joining the corners of the towel furthest from the loaf. Secure the joined towel points within a closed drawer (in a quiet area) so the loaves hang undisturbed in their slings for 45 minutes.
- While bread is rising, position the rack in the second or third lowest shelf in the oven and, if using a sheet of quarry tiles or a pizza stone, place it on the rack. On the rack below this, place a heavy-bottomed, oven-proof pan, which will preheat along with the tiles. Sprinkle a baker’s peel or a flat cookie sheet with cornmeal. Thirty minutes before the end of the rise, preheat the oven to 450 degrees.
- If not using tiles or a stone, brush or spray 1 or 2 large (preferably dark steel) shallow baking sheets with vegetable oil and sprinkle the interior with cornmeal. After mixing egg white and water, pour into a small medium-mesh sieve into another bowl to remove excess coagulation and any bubbles created while mixing. Place glaze next to your work surface.
- Working with one loaf at a time, carefully release slings and gently turn out loaves from towels (smooth side up) onto the prepared baker’s peel or baking sheet at least 3 inches apart. Use your hands gently to plump loaf into a neat shape.
- Using a sharp serrated knife or a razor, slash tops of each loaf three times horizontally, going 1/3 inch deep into the dough. Using a pastry brush, paint tops and sides of loaves (excluding slashes) generously with glaze.
- Just before inserting the dough into the hot oven, carefully pour ¾ cup warm water into the pan beneath the rack used to bake the loaves, then shut the door while you go get the loaves. If baking with tiles, insert the peel all the way to the back of the oven and with one swift jerk pull out the peel, leaving loaves on the hot tiles (preferably with three inches between them). If not using tiles or a stone, place loaves into the hot oven on their baking sheets as directed.
- Bake loaves at 450 degrees for 10 minutes. Reduce heat to 350 degrees and bake for 30 minutes. Remove from the oven and place on wire racks to cool thoroughly before slicing, 2 to 3 hours.
Notes
Recipe from Baking with Julia.
Total time does not include proofing time.
*I shaped one loaf as written and for the second, I made 3 ropes from each half of the dough and braided them like a challah.
Nutrition Information:
Yield:
36Serving Size:
1 sliceAmount Per Serving: Calories: 195Total Fat: 7gSaturated Fat: 3gTrans Fat: 0gUnsaturated Fat: 3gCholesterol: 12mgSodium: 225mgCarbohydrates: 29gFiber: 2gSugar: 4gProtein: 5g
Thatskinnychickcanbake.com occasionally offers nutritional information for recipes contained on this site. This information is provided as a courtesy and is an estimate only. This information comes from online calculators. Although thatskinnychickcanbake.com attempts to provide accurate nutritional information, these figures are only estimates. Varying factors such as product types or brands purchased can change the nutritional information in any given recipe. Also, many recipes on thatskinnychickcanbake.com recommend toppings, which may or may not be listed as optional and nutritional information for these added toppings is not listed. Other factors may change the nutritional information such as when the salt amount is listed “to taste,” it is not calculated into the recipe as the amount will vary. Also, different online calculators can provide different results. To obtain the most accurate representation of the nutritional information in any given recipe, you should calculate the nutritional information with the actual ingredients used in your recipe. You are solely responsible for ensuring that any nutritional information obtained is accurate.


57 Comments on “Pumpernickel Loaves”
We loved this bread! Such a rich flavor and the crumb was perfect. Great recipe!
Thanks a lot for sharing this recipe! The bread looks delicious and very healthy
Oh Lizzy, what a lovely braided pumpernickel bread! And that knife, wow! I love it!
Gorgeous pictures!
Se ve muy delicioso tomo nota su pan es maravilloso me encantò,abrazos.
Gorgeous bread!
It was a bit of a labor, but delicious
It’s funny, I love pumpernickle bread but do not have the desire to bake it. Chocolate chip challah, yes…pumpernickel, not so much! 🙂
I love the braided loaf – good idea! Your breads look wonderful.
oh, come on bill! that braided loaf looks great, and you’re right, I can’t tell the crust was a bit well done. 🙂
I love pumpernickel bread and yours looks absolutely perfect. You’re right the ingredients sound crazy but I can see how they would add more moisture and richness of flavor to the bread. I’ll have to check out your links and the recipe in Dorie’s book. She sure must adore you for sticking with her weekly recipes all these years. You’re so dedicated.
lol!! Love hearing Bill stories!! You have quite the picky bunch!!! The loaf still came out beautiful in our opinion!!
What a gorgeous loaf – isn’t it supposed to be dark like that 😉 Pumpernickel and rye – with seeds – are my favorite sandwich breads.
I’m going to have to take a look at that video! I recall trying a bread with molasses, espresso and chocolate powder but not the prunes. For some reason I have always avoided pumpernickel (maybe it was the caraway seeds) but I really want to try this one. Pinning this for later. Beautiful loaf of bread, blackened or not! 🙂
You’re so smart to watch the videos! I wish I had thought to do that. I was very confused by the instructions for shaping the bread. I’m so impressed by your photography skills – you would never know that the bread was burned.
Very interesting list of ingredients and good move omitting the caraway seeds. You’re a brave soul to tackle this one Liz and you pulled it off!
Not a beginner’s loaf, but one I would definitely make. Though I’d buy the prune butter… They look sensational Liz, in spite of the darkened crust!
Great post, I think I still need to get myself to that blog photography class! 🙂 braided loaves are so creative, love it!
Beautifull bread, lovin it’s shape and also it’s flavour……
btw, i guess you should had your own baker brand Liz…..
You make these loaves look so perfect 😀
Cheers
CCU
Who would have thought that prunes do so much? I never would have guessed! I love pumpernickel bread (but without the caraway seeds). No doubt I would have loved this loaf!
pumpernickel is one of my favorite breads of all time. I love love to have it but only have it when I buy it. So glad to see this recipe to make it myself
You always make gorgeous breads!
What a gorgeous loaf!
How delicious, Liz! You make it sound so easy xo
What a gorgeous loaf of bread and I’m a pumpernickel fan! Nice job 🙂
I enjoy pumpernickel but only on the odd occasion. Not sure that makes sense but if that’s all the bread I had to eat, I’d be like Bill. 🙂
As soon as I read the title, I knew Bill would have gone hungry. I’m not a fan of caraway seeds either so I would have left them out as well. I think the braiding looks very good and if you hadn’t have said anything I never would have known it had a black crust! We all have disasters in the kitchen as you know! xx
Lizzy,
I haven’t had pumpernickel bread in a while. Your bread looks delicious.
Annamaria
I think your bread looks great but I’m with you. I’ve never been a big pumpernickel fan. Maybe it was always the caraway that scared me away. But my in laws go out of their way to get a good pumpernickel loaf.
Love the braided pumpernickel loaf! Learning that prunes are a natural conservative was new to me too. The prune lekvar recipe from BWJ is super easy and fast to make.
I knew about the prunes and molasses, but I didn’t realize there was espresso and chocolate in there, too. That is a lot of flavor! I don’t think I could pass a brown loaf over on my family. I think you must have gotten an A in that self taught photography class 🙂
Ah Lizzy love this loaves look delightful:)
Lizzy, I adore your gorgeous, and delicious pumpernickel bread. I love caraway seeds in rye bread, but no need to have caraway seeds in pumpernickel; at least I’ve never had them that way. I also love the pumpernickel-rye swirl so much, as well. Love the recipe, and I will attempt to try to make this, hoping it will turn out! xoxo
I love pumpernickel bread. Yours looks like it came from a bakery! It’s gorgeous!
This bread looks beautiful and perfectly braided! I have never tried pumpernickel bread before but it sounds interesting.
Liz you are becoming the braiding queen! This is a beautiful loaf (great work on the photos with new tricks) and so full of flavor indeed. I would also opt for no caraway seeds, for once I agree with your hubby 🙂
That’s a very different and beautiful pumpernickel, Liz.
Oooh, Oooh, Oooh! Your bread looks so beautiful! I’d love to find a blog photography class. Can you share where you found it?
Hi, Margaret! So far, I’m all self taught…although, I’m exploring the possibility of attending a workshop next year.
You are the master of braided breads. WOW! This is beyond beautiful!!!
Once I get my KitchenAid, I will also make this!! 😛 And that prune butter sounds soooo good!
whoa. that’s an intense process lol
It’s been far too long since I’ve hard pumpernickel. Your braid is perfect!
I like a good pumpernickel, but I’ve never made on before. That’s why this one is bookmarked for a future run in the kitchen. Who knew prunes were a natural preservative? Liz, you’re a dear for fessing up about the slightly blackened loaf. I’d have never thought that was the case…it looked like the patina of a well-baked loaf to me!
My favorite kind of sandwich bread!
Your loaf looks beautiful!
Liz: I love pumpernickel bread…but I have never seen a loaf as pretty as yours. Your technique rocks!!!
I love pumpernickel bread, in fact I’m enjoying a pumpernickel bagel right now! Hope to find time to try the recipe soon!
I like pumpernickel because of the name…such fun, but like you it isn’t my first choice of bread. Your loaf looks great though, I couldn’t tell the blackness at all.
Prune butter? Where can I find this magical sounding stuff? I don’t think I’ve ever seen that in the store. This bread sounds like fun to make, at least once!
I ended up ordering from Amazon to avoid having to check every market in the area. I’m wondering if it will be more accessible during the holidays?
Wonderful braid Liz! I ended up making my own prune butter and it was really, really easy, because I hate driving around finding ingredients. too.
What an amazing job you did with this bread. I like that you left out the caraway seeds.. I’m not a big fan of those. Sorry Bill didn’t try it at least. You sure put in a lot of work and effort on this bread… It looks wonderful! Even if you don’t make this bread again…you can take a bow on what you did here. 🙂
Very interesting indeed to add prune butter. Pumpernickel is one of my favorite bagel / breads andy yours looks absolutely fantabulous =) Thank you for sharing the video link, Liz.
You make bread baking look so easy Liz, this loaf looks wonderful 🙂 I still can’t notice the blackened parts even after you mentioned it. I’ve been too scared to try making pumpernickel bread since I’m afraid my hubby may not try it either 🙁 Thanks for sharing and hope you have a great week!
What an interesting loaf. I made pumpernickel once before, but don’t remember prune juice or using a sling. I remember it being moist and tasty, but also not one of my favorites. Yours looks perfect.
Lizzy, I don’t blame Bill for not touching the pumpernickel. A friend from Germany brought back some and after one bite, I am sorry to say, I threw it away. Not my kind of bread too 🙁
Very adventurous! Your loaf looks great and I could have used those photography tips last week:@)
PS-I always chuckle at your hubby, my oldest son is exactly the same way. The funny thing is, when he was a baby I couldn’t shovel food (ANY food) in fast enough! Oh well…
Never knew that pumpernickel was made with prunes.
Actually, I don’t think I’ve ever had pumpernickel before.