How to Make Rosettes Cookies
Rosettes, the fried Scandinavian cookies, are crisp, delicious and so festive when dusted with powdered sugar. I’m sharing my tips on how to make rosette cookies in your own kitchen. They’re perfect for the holidays!
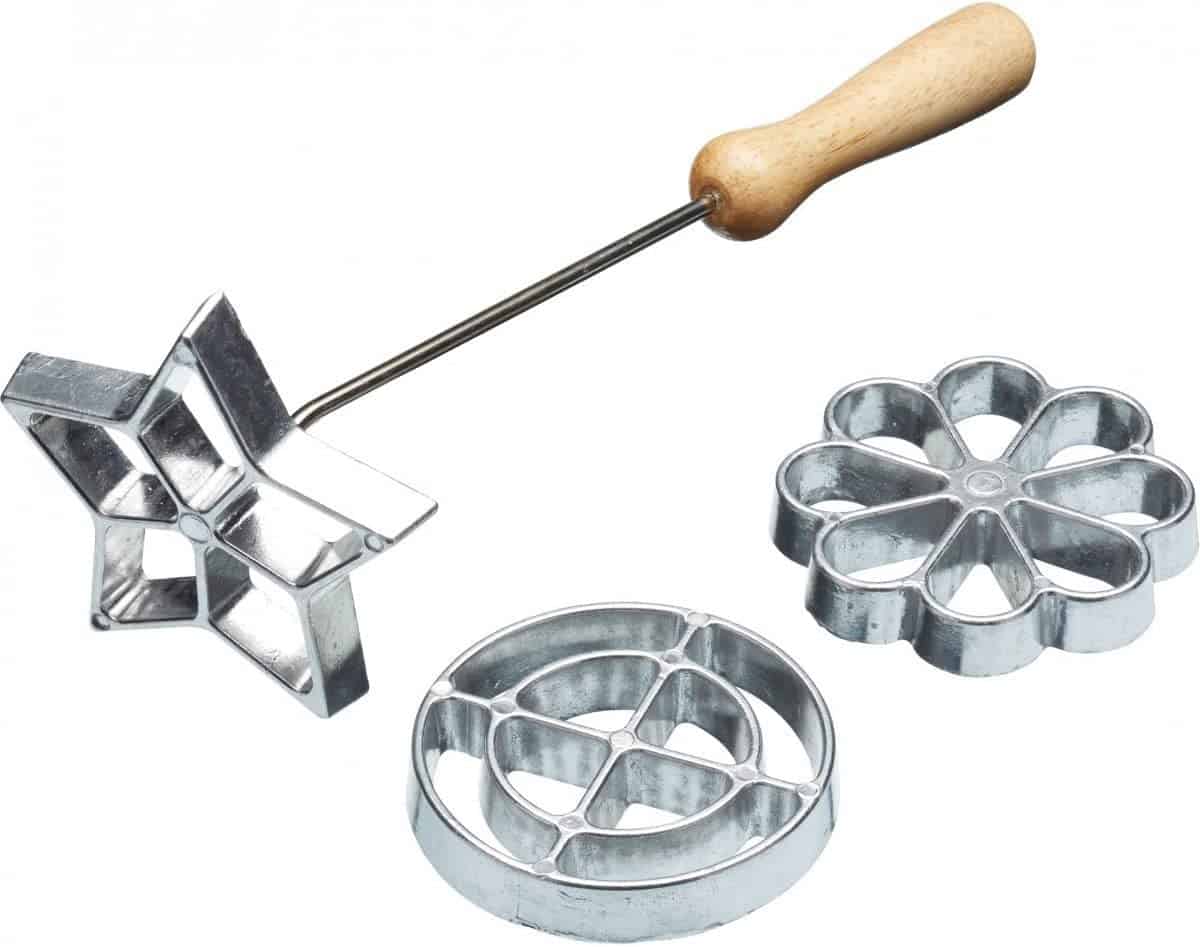
You’ll need to get yourself a Rosette Iron, and enough canola oil to deep fry them and you’ll be set! Shaped like stars and snowflakes, they’re a classic holiday treat.

Why You Must Make
- They’re a beautiful addition to your holiday sweets repertoire.
- Perfect for cookie exchanges, they’re unique and festive.
- Dusted with powdered sugar, these look like they’re coated with a dusting of snow.
- Rosettes can be hung on the Christmas tree, using a ribbon loop as a hook.
Cookies like these perfect Cream Cheese Sugar Cookies are a given when it comes to my baking list, but I also thought back to my childhood and was reminded of these sweet, crispy rosettes. Learning how to make rosettes is one of the many legacies my dear mother passed on to me. Scroll down for my tips for making perfect rosettes.
How to Make
- Heat oil in a deep-fryer or deep, heavy saucepan.
- Make the batter.
- Heat the rosette iron in the hot oil for 2 minutes.
- Drain excess oil from the iron and dip the iron into the batter, then immediately place it in the oil.
- Fry until golden.
- Let the excess oil drain off the rosette onto paper towels.
- Gently remove the rosette from the iron with the tip of a dinner knife if needed.
- Repeat by reheating the iron in oil for about a minute, then dipping and frying till all batter is used.
- When cool, dust with powdered sugar to serve.

Expert Tips
- My mom always used lard to make these rosettes. The aroma permeated the house and lingered for days. But these rosettes were treasured treats among the lucky friends and neighbors who were recipients, and frying these was a holiday tradition. For this batch, I used canola oil. The lard found in most grocery stores sits on the shelf, not in the refrigerator cases. It’s not the same quality as my mom used, and oil with a high smoke point is a good substitute.
- The simple batter takes only seconds to prepare. Just whisk together all the ingredients.
- PRO-Tip: The batter should be smooth, but don’t overmix as you do not want air bubbles to form.
- PRO-Tip: The oil must be heated to and maintained at around 375º. Use a candy thermometer unless you have a deep fryer with a temperature gauge. If you’re frying these on the stovetop, adjust your burner as needed to keep the temperature steady.
- PRO-Tip: Use a heavy-duty saucepan if you don’t use a deep fryer. You’ll want your oil to be approximately 3 inches deep.
- PRO-Tip: The rosette iron must be heated in hot lard or vegetable oil before being plunged into the batter and back into the hot oil to cook. Give the iron a good minute or two to reheat or the batter will not adhere properly.
- Let the excess oil drip off the iron, then dip the iron into the batter about 7/8th of the way.
- PRO-Tip: You do not want any batter to flow over the top of the iron.
- In less than a minute in the hot oil, the rosette turns golden brown and can be removed to paper toweling to drain. I like to detach the rosette from the iron and flip it over to make sure both sides get evenly browned before draining it on paper towels.
- Use a table knife to gently pry the rosette loose from the iron if it doesn’t slip off on its own. Just a few nudges are needed.
- A dusting of powdered sugar is the finishing touch for these elegant, delicate and festive “cookies.” Wait until the rosettes are cool before sprinkling them with powdered sugar.
- PRO-Tip: Rosettes freeze beautifully. If you plan to freeze them, wait until they’re defrosted to garnish with the powdered sugar.

Frequently Asked Questions
Rosettes are Scandinavian in origin, and popular in both Norway and Sweden. The name “rosettes” comes from the Norwegian word rosetbakkelser.
But, according to a comment from a reader in Spain, they’re also quite popular there as a Carnival dessert. They’re called Flores de Carnaval or Flores de Entroido (the Galician word for Carnival).
Stored at room temperature, loosely covered, they’ll last 2-3 days. They can be frozen for up to 2 months. If frozen, rewarm to room temperature, and then sprinkle with sugar.
I like to use a Rubbermaid or Tupperware container and place a sheet of wax or parchment paper between the layers. Make sure they are completely cool before freezing. Place in an area of the freezer where they won’t get jostled around. Wait to dust with powdered sugar until after they’re defrosted.
If the cooking oil was not hot enough, the rosettes will absorb excess oil and become soggy. Also, if they’re not stored properly, they can lose their crispness.
They can be crisped in a 350-degree oven for a few minutes.
Only cast iron rosette irons need to be seasoned. Use the same process as for a cast iron pan. Make sure to clean the irons and let them dry completely, then coat them in vegetable oil or shortening. Place on the rack of a 375-degree oven with a layer of foil on the rack below.
Heat them for about 45 minutes to an hour, turn the oven off, and let them cool completely.
You May Also Like:
- 127 Favorite Christmas Cookies, Candies & Holiday Recipes from Brown Eyed Baker
- Candy Cane Blossoms
- Pecan Pie Thumbprint Cookies
- Stained Glass Cookies
- Holiday Truffle Cookies
- 30+ Christmas Cookies
- Plus, Tips on How to Host a Cookie Exchange
- More Holiday Recipes
Do you have a favorite cookie to take to a Cookie Exchange? Let me know in the comments. I always need new ideas.

Rosettes Recipe
A beautiful Christmas/holiday cookie!
Ingredients
- 2 eggs
- 1 tablespoon sugar
- 1 cup flour
- 1 cup milk
- 2 teaspoons vanilla
- ¼ teaspoon salt
- Powdered sugar for dusting
- Canola oil (or lard) for deep frying
Instructions
- Combine egg, sugar, and salt and whisk to combine. Add remaining ingredients and mix till smooth.
- Heat oil in a deep-fryer or deep, heavy saucepan to 375º.
- Heat rosette iron in oil for 2 minutes.
- Drain excess oil from the iron and dip into the batter, ⅞ up the sides of the iron (batter should not run over the top of the iron), then immediately into the hot oil.
- Fry until golden for 30 seconds or so. Remove to a paper towel-lined rack to cool. Gently remove from the iron with the tip of a dinner knife if needed.
- Repeat by reheating the iron in oil for about a minute, then dipping and frying till all the batter is used.
- Dust with powdered sugar to serve.
Notes
Recipe courtesy of my mom.
Do not overmix the batter. You do not want air bubbles.
These freeze well.
Recommended Products
As an Amazon Associate and member of other affiliate programs, I earn from qualifying purchases.


Nutrition Information:
Yield:
36Serving Size:
1Amount Per Serving: Calories: 35Total Fat: 0gSaturated Fat: 0gTrans Fat: 0gUnsaturated Fat: 0gCholesterol: 11mgSodium: 22mgCarbohydrates: 7gFiber: 0gSugar: 4gProtein: 1g
Calories do not include the oil absorbed during the cooking process.
My Mom’s Recipe for Rosettes
Each December, my mom and Mrs. Homer (who happened to be my best friend’s mom) would plan for an evening of deep-frying rosettes in lard plus a lot of gabbing. After a few years, they stopped alternating homes and they’d just meet at our house.
Apparently, my mom had lower standards when it came to a house smelling like a greasy diner. So we’d gather in the kitchen watching until we were shooed off to bed.
My mom stored her share of these Scandinavian cookies in our basement freezer until she packaged them up during Christmas week to be delivered to all our dearest friends. I remember coming home from college and still accompanying my dad on these deliveries.
My sisters and I could not resist swiping a few out of the freezer to sample, but I’m sure the trail of powdered sugar gave us away. There are a lot of rosette irons available on Amazon, like my cast iron version. There is a link near in the recipe card.


89 Comments on “How to Make Rosettes Cookies”
I made these rosettes today. The first 5 came out great & delicious, but then when I dipped the iron in the batter again it started to cook in the bowl, and wouldn’t adhere to the iron. What was l doing wrong?
Hi, Verna, I haven’t had this problem, but here is what I found: Heat iron in hot oil and tap on paper towels before making each rosette. If iron is not hot enough, batter will not stick.
I’d like to use a mixture of lard and Crisco for my Rosetti can you recommend a amount of each?
Hi, Liz, These two fats are basically interchangable. I couldn’t find any recommended ratio so I’d start with equal amounts and see how you like the results. Let me know how it goes!
Very nice, but your rosettes are inside out! 🙂
This is how my mom displayed them and her mother before her 🙂 I didn’t know there was another option! I will check this out.
Would peanut oil work to fry the rosettes in? Is it best to use whole milk?
Yes, peanut oil has a high smoke point so it would be great for frying. We use 2% milk since that’s what we drink, but whole milk would also work well. Hope you enjoy these, Debra!
My dear Mom used to make these cookies, she had a variety of shapes, I haven’t thought about them in years, thanks for the memory jolt!
I can’t wait to make these. My mom was full Norwegian. She made these at holiday time. I haven’t had them in years. I need to see if I still have my mom’s rosette iron. If not, I will be ordering one. So excited to start making these again.
I’m so glad, Kim. I’m lucky enough to have my mom’s rosette irons. They are wonderful for the holidays, aren’t they???
What a cool thing! I love old-fashioned, super-traditional desserts like this. Let me tell you, if these were hanging on my tree in plain sight, they wouldn’t be hanging there for long!
Liz, the season of baking really begins! I enjoy Rosettes, and it’s been awhile since I have enjoyed one. I enjoyed your post.
Velva
My mother used to make rosettes every year at Christmas. Because we lived in northern IL and it was always dry and cold at that time of year, she never froze any.
Instead, she would put them in an open cardboard box, layers separated by sheets of paper towels, and leave them in a spare room that had the heat turned off. She also dipped them, face down, in granulated sugar instead of dusting them with powdered sugar shortly before serving. I don’t know why she deviated from the norm with that step but I do it too, out of tradition. I will try them with the powdered sugar this year.
She’d make a large quantity of them and then plate up however many needed for bringing to gatherings and giving as gifts.
The house would indeed smell like a greasy diner for a few days after the big frying day.
That’s probably why (to my knowledge) nobody in my family except me has made them since mom passed away. Even though we divided up her irons, sadly.
I’ve tried making them in the garage to keep the smell (and apparently, a light layer of oil) out of the house, but that can be pretty cold and uncomfortable so I have moved back to the kitchen when I make them.
They are a labor of love, aren’t they??! You’ve inspired me to make a batch this year!
I would love to know how you package them to freeze????
Hi, Nicole, I need to add that information to this post! I place them in a large Rubbermaid or Tupperware container with wax or parchment paper between the layers. Then place them somewhere in the freezer where they won’t get too jostled around. Hope that helps!
We cook them,at least very similar, in Galicia- North West of Spain, but here a a Carnival dessert. We call them Flores de Carnaval or Flores de Entroido(the Galician word for Carnival)They are also cook in other parts of Spain
Oh, that’s great to know, Patricia! Thanks so much for sharing.
Being raised in a Scandinavian home as well, rosettes at Christmas time were an absolute must!!
I always make at least one batch each holiday season and enjoy sharing them with neighbors, co-workers, and family. We never seem to have enough to freeze, but I appreciate reading your hints about that. When I began teaching elementary school after college, I was surprised to find that my
Chinese-Hawaiian teaching mentor made rosette cookies too!! The only different ingredient in her recipe was a sprinkling of sesame seeds on top of the batter before inserting the rosette iron. I only wish I had discovered how a traditional Scandinavian recipe came to be a favorite in her family. I recently made your Cookies and Cream Dessert Dip for a tailgate party – an awesome dish with only a “licked-clean” bowl at the end!
Hi, Stephanie! So glad to hear from another rosette lover and maker. Thanks for saying hello and sharing your stories. That dessert dip is addictive—perfect to make for gatherings! Wishing you a very merry Christmas season!
I used to make these for my grandson but now Incant get the rosette to come off the iron
Hi, Jerre,
Have you tried using a knife to help the rosette detach from the iron? If that doesn’t work, try reseasoning your iron by heating some oil up to about 350-375 degrees and placing the iron into the oil for about 20 minutes. Make sure the iron has been scrubbed well first so that any residue from previous batter is totally gone. I hope that helps—good luck!!
These rosettes are so pretty! They’re a perfect addition to the holiday cookie tray!
I love cookies that are a family tradition! That makes them so special!
These cookies really are a treasure! I have had them once or twice and they are truly special. What a great tradition to carry on!
This is really amazing and so adorable! My kids loved it!
My neighbor used to make these every Christmas and I always looked forward to them.
These cookies are beautiful! They are like little pieces of art! Gorgeous job! 🙂
These Rosette cookies are one of my very favorites when they are done correctly. Your cookies look perfect. I need to get one of these rosette irons! My family will love it.
This is a fascinating recipe. I’ve never heard of deep fried rosette cookies. They remind me of snowflakes. What a fancy little cookie. Looks yummy too.
Dad said this recipe was the best rosettes he has ever had! Thank you!
Wonderful!! Thankks so much for letting me know!
omg these sound incredible! I’ve never had rosettes before but I need to!
My 100% Norwegian husband can’t cook..he burns water! But….he can whip out 800 rosettes without one failure…and he’s 93 years old!
Wow! That’s impressive, Ronna! I hadn’t made them in years and I was a little rusty, but I finally got the hang of it again 🙂
I can’t wait to try these! Look so fun!
Just when I thought I had all the kitchen tools I need, now I need one more! These are beautiful!
Beautiful! But now I need a rosette iron! Can I fit another kitchen tool in my kitchen? Of course!!
These are absolutely gorgeous Liz! Such fun memories tied to these! Thanks for sharing!
Love the story behind the Rosettes almost as much as the beauty of the dessert. How wonderful to have such lovely Christmas memories tied to your mom…and sister! Always nice to have an accomplice when sneaking into the basement =)
Such an excellent tutorial on these pretty rosettes! Thanks for all the great tips!
Stunning Liz, as always, and I love the fun story behind these. I’ve had them on my list to try, I even have the wand sitting here next to me, this post has inspired me!
These are such a classic Mid Western holiday cookie and I love them!
I love these!! So beautiful and taste so good!!
These rosettes are stunning, Liz! Such a perfect holiday cookie!
I have never seen these cookies before but they are so pretty! Looking forward to trying these. Happy Holidays!
Liz! These delicious cookies are a must try! I can just imagine how crisp they are and eating them hot… oh my so delicious.
We are doing a cookies from around the world round up. Can we please link up to this recipe. So delicious… Take Care
Of course you can! Thanks for including me!!! xo
Wow, these are beautiful! I’m going to try making them this weekend!
I remember making these with my mom when I was young, and don’t have her recipe. Thank you for reuniting me with this beautiful recipe!
Thank you for sharing this treasured recipe they are delicious!
They look so beautiful and I’ll bet they taste great. I’d probably break them all if I tried to make them
Definitely a favorite at our cookie exchange!
Beautiful recipe dear Lizzy , hugs!!
I love old family traditions! These are great!
I’ve never made–or heard of–rosettes cookies before but they’re gorgeous! I need to add them to my ever-growing holiday baking list. Happy almost Friday, Liz!
How fascinating Liz! I’ve never had these but they are very pretty. I love food memories and can recall swiping goodies that were meant for gifts from time to time. Especially bourbon balls which were doubly bad!
I’ve always been intrigued by these beautiful cookies! Haven’t tried to make them (yet) though… A perfect gift:@)
I had the most horrible day of my life today, and then I read your post. Thank you!!!!!! I grew up with these and still have the iron, with differently shaped rosettes, but I lost the recipe many years ago. This post made my day better, and I am making these this weekend. We used to eat it with cinnamon sugar
Oh, I’m so glad, Susan! I had not made these in years and took a few sacrificed rosettes to get in the swing! Topping with cinnamon sugar sounds fabulous. Happy holidays/Merry Christmas!!
They look so beautiful and I bet they taste amazing!
I love these cookies!! My mom makes them. I have so much trouble making them….I think I don’t let the iron get hot enough so my batter doesn’t come off easily. Yours look gorgeous!
Your rosettes look beautiful Liz! My Grandma used to make those and they were always my favorite cookies of hers! Hope you are having a wonderful Holiday season :)!
Your rosettes are beautiful! I’ve never made them before nor do I have an iron. I may have to start a new tradition….
Absolutely beautiful Liz…almost too good to eat. almost. 😉
These are beautiful! Almost too pretty to eat!
These cookies are look *almost* to pretty to eat!
Lizzy, these rosettes are so cute!!!
Have a nice day
Lizzy,
Your rosettes look delicious. I haven’t made rosettes since I was a teenager. I need to find what happened to my Mom’s rosette irons.
My dear Mother used to make these, so tasty. She would serve them with whipped cream.
So simple but absolutely beautiful Liz!
These are deliciously beautiful! Great work Liz!
These are so pretty and delicate Lizzy. I’ll bet you can eat a ton of these!
How gorgeous! And with powdered sugar!
Oh my goodness – these are absolutely, 100% BEAUTIFUL!
These look so delicate and delicious. They’re so pretty!
Gorgeous! I am impressed!
These are so delicate and beautiful! What a great addition to a holiday plate. And congrats on the big Wordpress transfer!!
I love rosettes, but I’ve never made them. These are so pretty. I’m inspired to give it a try!
What a beautiful cookie and a wonderful story and memory!
these look gorgeous! of course they’re delicious–they’re fried! 😉
Love these cookies Lizzy. They look like star waffles! Happy Holidays my friend and cookie exchange for Sunday Suppers sounds awesome!
Welcome to wordpress Liz. you’ll love it!
the cookies look amazing! thanks for sharing
Oh these are such lovely cookies, Liz! It’s great to keep those memories you love going. I wouldn’t leave a trail of powdered sugar though….because I’d devour every last one of them while hovering over the plate! Beautiful! : )
I can only aspire to make cookies as beautiful as yours! Love the memories this one has for you.
What gorgeous cookies! They are like mini works of art. Well done!
I love really pretty cookies like this!! They look so very good!!