Layered Ice Cream Pie with Chocolate Cookie Crust
Layered Ice Cream Pie with Chocolate Cookie Crust: A decadent, frozen no-bake dessert that’s a breeze to prepare. And this ice cream pie is perfect for those dog days of summer when turning on the oven is the last thing you want to do!
Whether it’s due to the hot, sultry weather or the lack of a kitchen due to renovations, easy ice cream desserts are a delicious solution. Our kitchen is being drywalled so still no appliances, countertops, or cabinets, and I’ve been turning to lots of no-bake treats, like this Frozen Pie, for my dessert-loving family.
Why You Must Make
- No baking is needed so it’s perfect for summer entertaining.
- It’s perfect to make ahead and store in the freezer.
- An ice cream pie recipe is highly adaptable. Make it will any of your favorite ice cream flavors.
Expert Tips
My first ever ice cream pie was called Mississippi Mud Pie. It was from a cookbook I received as a shower gift before I was married many moons ago. Back then, I made the recipe exactly as written with a touch of cognac and heavy cream added to the chocolate ice cream before spreading it into an Oreo crust. Eventually, I added a layer of fudge sauce and it’s become a summer dessert tradition. Now I can make it blindfolded!
- Make and freeze your cookie crust so that it’s firm when you spread the ice cream across the surface.
- Allow the ice cream to sit at room temperature for a few minutes to allow it to soften. You don’t want it totally melted, but at a spreadable consistency.
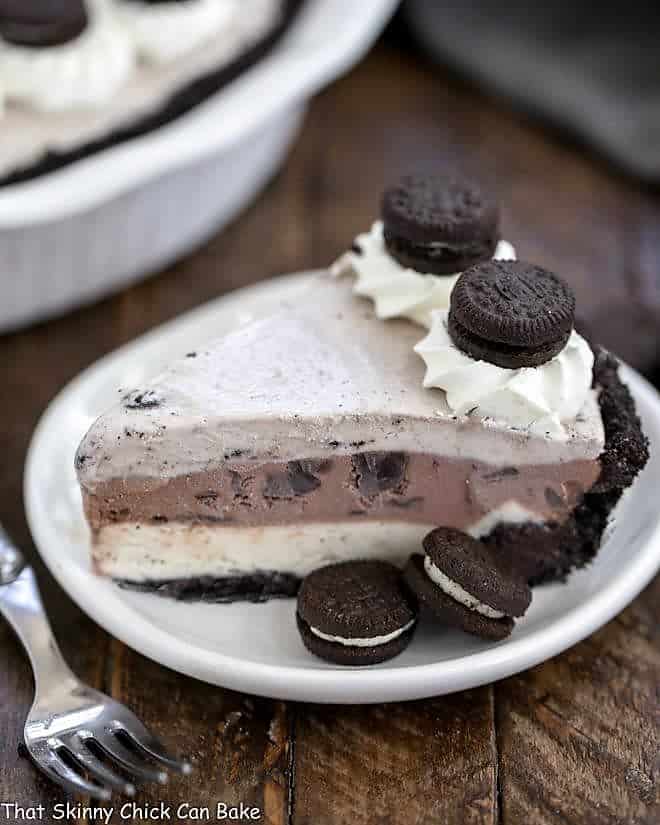
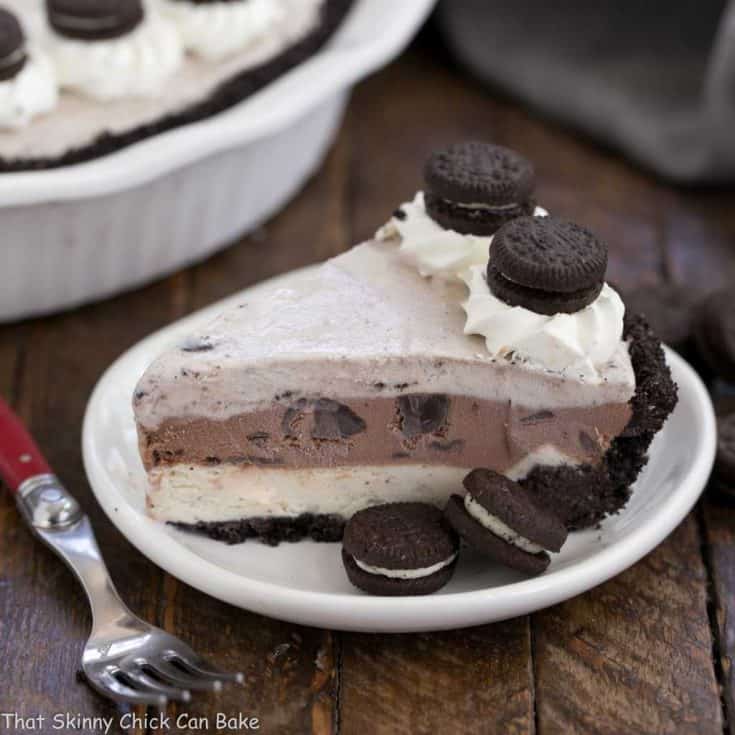
- When making your layers, eyeball it so that each layer fills about 1/3 of the depth of the crust. Use an offset spatula to spread and smooth each layer as flat and level as you can make it.
- Freeze each layer before adding the next.
- Alternate light and darker-colored ice creams, so each layer is distinct.
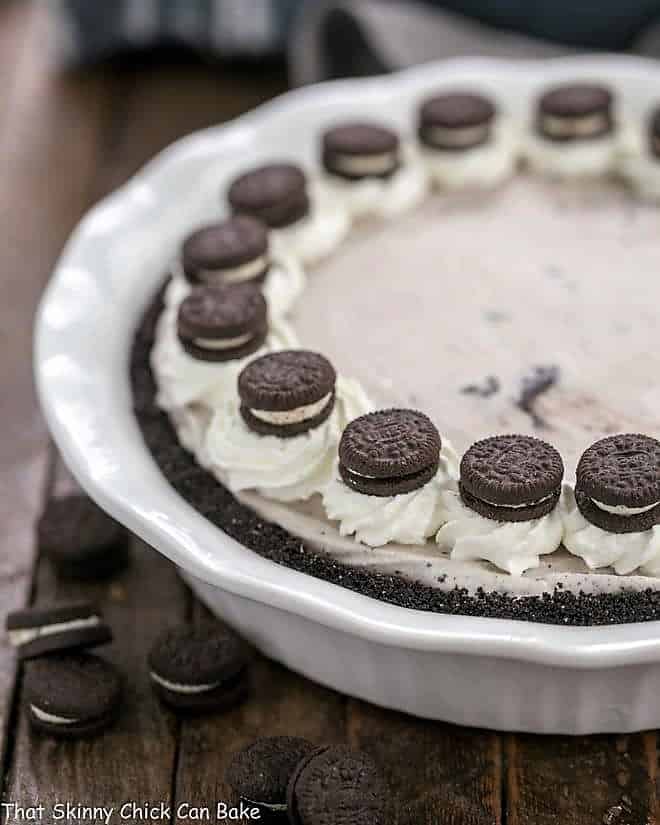
- If you like to garnish, whip some cream and pipe rosettes around the perimeter. I topped each rosette with a mini-Oreo since my top layer was cookies and cream!
- Using a premade chocolate crust is always an option, but for company, it will look much better served out of a ceramic or glass pie plate with a homemade crust.
Frequently Asked Questions
My ice cream pies typically have 3 components: a cookie crust, ice cream, and an ice cream topping. Our family favorite combination is an Oreo crust, chocolate ice cream with a slosh of Kahlua, then a fudge topping.
Another beloved version is a graham cracker crust, any sort of butter pecan type of ice cream with a heavy drizzle of caramel sauce. The options are endless!
1. First, make your crust and chill or bake as directed. Cool if needed.
2. Allow your ice cream to soften so it’s spreadable.
3. Spread ice cream into the pie crust, making it as level as possible.
4. Freeze until the ice cream is solid.
5. Repeat if adding more layers, making sure to freeze each layer until hard before continuing.
6. Add toppings and/or garnishes.
Use a hot knife to make it easier to cut through the frozen layers. Wipe it off and reheat as needed. You may run your knife under hot water or quickly (and carefully) through the flame of a gas cooktop.
If you are able to keep the pie airtight using plastic wrap, then a layer of foil, this pie should keep well for up to a month. The goal is to prevent frost from developing across the surface.
Pipe whipped cream swirls around the perimeter. They can be topped with anything that reflects the flavors of your pie like mini Oreos, candies, or other small cookies. Or top slices with a dollop of whipped cream plus a drizzle any ice cream topping that works with the flavors of the pie!
You May Also Like
- Cabernet Ice Cream with Chocolate Shards from Barb – Creative Culinary
- Grilled Peaches with Vanilla Ice Cream and Honey Balsamic Drizzle from Carol – From a Chef’s Kitchen
- The Best Coffee Ice Cream
- Cheesecake Ice Cream
- Chocolate Ice Cream with Fudge Sauce
- Plus, all my Best Dessert Recipes
Layered Ice Cream Pie with Chocolate Cookie Crust
An easy No-Bake Ice Cream Pie.
Ingredients
- 1 9-ounce package of chocolate wafer cookies (or 22 chocolate sandwich cookies), processed or crushed into fine crumbs
- 6 tablespoons melted butter
- 2 tablespoons sugar (omit if using sandwich cookies)
- 3 pints of ice cream (I used vanilla bean, cookies and cream and double chocolate chip), you will not need all the ice ice cream.
Instructions
- Mix cookie crumbs, melted butter, and sugar (if using) in a medium bowl. Pat into a greased, 9-inch pie plate. Freeze.
- Set out your first ice cream selection to soften while the crust freezes.
- Eyeball the depth of your crust as you'll want to fill the bottom third with your first ice cream. I chose a light-colored ice cream to contrast with the dark crust. Place most of the first selection into the bottom crust coming up 1/3 of the way up the pie.
- Smooth with an offset spatula and freeze until solid.
- Repeat with slightly less of the second ice cream (I used the chocolate for contrast), and repeat by freezing. Then finish with enough of the third ice cream to fill the crust.
- Freeze until solid before serving.
- To garnish, pipe whipped cream swirls around the perimeter and top with mini Oreos.
Notes
Please note there are extended freezing times between layering the ice cream flavors.
It's best to make this pie the day before you serve it to allow for all the layers to freeze properly.
Nutrition Information:
Yield:
8Serving Size:
1Amount Per Serving: Calories: 484Total Fat: 27gSaturated Fat: 15gTrans Fat: 0gUnsaturated Fat: 10gCholesterol: 74mgSodium: 358mgCarbohydrates: 56gFiber: 2gSugar: 41gProtein: 6g


19 Comments on “Layered Ice Cream Pie with Chocolate Cookie Crust”
I love cookies and cream stuff so this ice cream pie looks AHMAZING! pinning!
You’re going to send me over the edge with this one Liz! I can’t wait to make this and just maybe I’ll share it with my family 🙂
I love ice cream pies, this is a perfect treat to cool off with during Summer.
Oh boy! This ice cream pie looks soooooo delicious! And the recipe seems easy to follow. Can’t wait to try this one. Found you at the Inspiration Monday link up hosted by Scattered Thoughts of a Crafty Mom.
I recently started a new link up on my EyeLoveKnots blog, and would love if you came to link up! Here is the current one: https://eyeloveknots.com/2018/06/super-crafty-sunday-link-up-6-eyeloveknots-sponsored-giveaway.html
Such a dreamy ice cream pie, I think this needs to be on the dessert menu for Father’s Day!
I haven’t made an ice cream pie in ages. I like the idea of adding different flavors for a pretty layered look. I bet it disappeared quickly.
If this is the family favorite, I think I would fit in quite nicely. Hope that kitchen gets finished soon Liz, though eating like this might keep me hoping the cabinets take a little longer!
Great tips for making an ice cream pie! It looks so easy yet so decadent and the perfect summer dessert. Our kids will love this!
Some great tips for making ice cream pies. And a great recipe for this pie, specifically! This looks excellent. Perfect way to cool off, too. Thanks!
I love ice cream dessert. This layered ice cream pie sounds easy to make and delicious. A win win!
I’m normally not a fan of ice cream and cookies, but oreos or similar sandwich cookies make a delicious addition. This ice cream cake looks and sounds delicious!
Gorgeous pie Liz!! I love the piped whipped cream and mini Oreos. My ice cream pie memory is one with a layer of fudge, then chocolate ice cream, and then coffee ice cream. So good.
I am so impressed that you can create this beautiful dessert without an operable kitchen – you are my hero! This is such a perfect way to finish any summer supper!
Ice cream heaven in a pie! Yes this is perfect for upcoming crazy summer days. So when are you planning to get your kitchen back??? But you are doing great without it.
Liz, you’re a goddess! Love this ice cream pie like crazy and the sandwich cookies here set it over the top! DELICIOUS!
I know a bunch of teens who will be head over heels with this one! Great recipe for entertaining my teen’s friends!
This looks so fabulous – and the perfect dessert on a hot evening! Oreo crusts are such a favorite of mine!
OMG, this has my families name written all over it!
So rich and so tempting!