Homemade Banana Pudding
This Homemade Banana Pudding is a cinch to prepare and is perfect for banana cream pie lovers who don’t have time to roll out a pastry crust.
Making Magnolia Bakery Banana Pudding was my sneaky way of getting out of making a banana cream pie! Layering vanilla wafers instead of making a pie crust made this a less tedious way to put a smile on the dear husband’s face!
Why You Must Make
- Banana Pudding has been around since a recipe was posted on a box of Nilla Vanilla Wafers in the 1920s.
- This beloved recipe for Magnolia Bakery’s Banana Pudding was revealed in their cookbook so now everyone can make it at home!
- Using a box of instant vanilla pudding makes this much easier than other recipes that are made totally from scratch!
With no fussy pie crust to make, a box of pudding mix, and a can of sweetened condensed milk, this banana pudding is so much easier to make than a banana cream pie but just as delectable!

Expert Tips
- Use ripe, not overripe, bananas for the best banana flavor. The skins should be yellow, not spotted, without any hint of green unless on the stem. The bananas should be firm.
- PRO-Tip: Briefly soak your banana slices in 7-Up or Sprite to minimize the oxidation process.
- Though some banana cream pies and puddings use banana extract or juices to flavor the pudding, I love the simplicity of making whipped cream-enhanced vanilla pudding. The two layers of sliced bananas provide plenty of flavor and some banana extracts have an off-putting taste. I was traumatized with liquid banana-flavored Dramamine, for motion sickness, as a child!
- Make sure the water and pudding mixture gels before proceeding with the recipe. If it does not set properly, your pudding will be runny.
- Chill for at least 4 hours before serving so the banana flavor can infuse into the filling.
- This recipe makes 14-16 servings so it’s great for a crowd. You’ll want to start it early in the day if making for company.
- If using a glass bowl, add the pudding to the center of the bowl, then spread it outward to the sides. This will minimize smearing the sides of the bowl.
- Let sit out at room temperature for about 30 minutes before serving. Very cold desserts will dull the flavor.
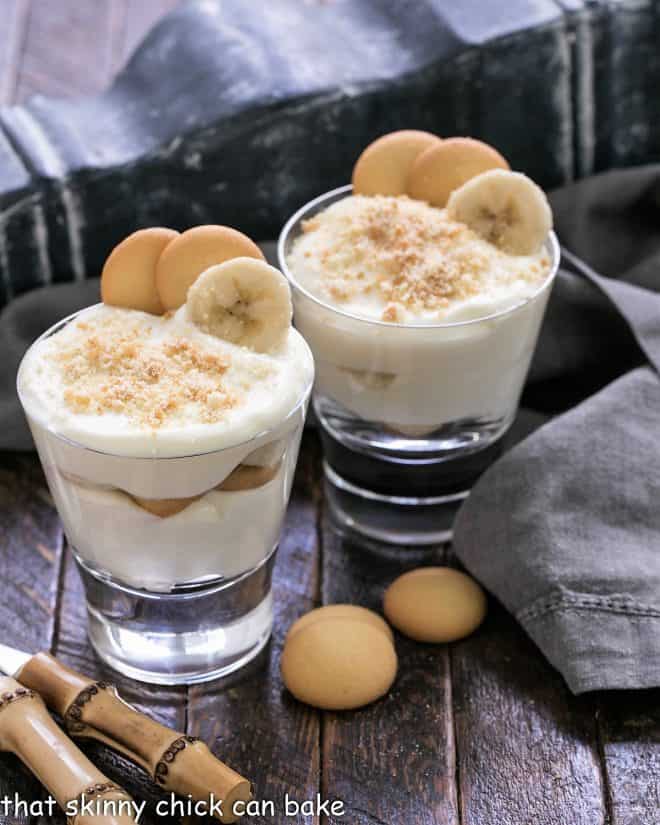
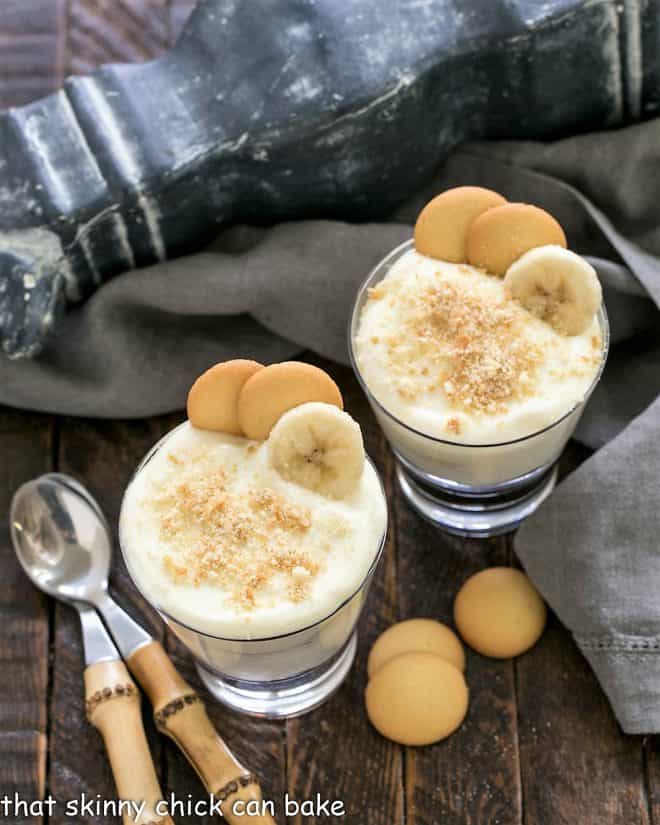
- If making individual servings, buy some mini vanilla wafers to garnish. You can also slice a banana before serving to add to the garnish.
- Banana pudding will last about 2 days before the bananas start to deteriorate.
- Don’t freeze banana pudding as both the bananas and pudding won’t defrost well.
Frequently Asked Questions
If making for company, make early in the day you plan to serve it. It will still be fine the next day, but the presentation will be best on the day it’s made as the bananas will start to oxidize or turn brown as they age.
Allow for 4 hours of chilling time before serving to let the vanilla wafers soften.
It’s at its prime for about 2 days. Any longer than that and the bananas will start deteriorating. But it will still be safe to eat for up to 4 days.
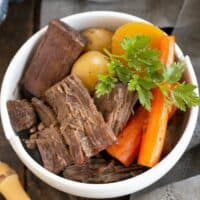
Layering depends on your recipe. For this recipe you layer vanilla wafers, then bananas, and then pudding. Try to make the layers level if using a glass bowl.
Unfortunately, banana pudding does not freeze well.
Bananas naturally turn brown from being exposed to the air. The best way to minimize this is to make sure the banana slices are completely enveloped by vanilla pudding to prevent any contact with room air or are treated with citric acid.
If you toss your banana slices in lemon juice, orange juice, or Sprite, the citric acid will delay the oxidation process. I prefer not to taste the tart lemon juice, so my preference is to use orange juice or a lemon-lime soda like Sprite or 7-Up.
Don’t be tempted to use under-ripe bananas even though they’re slower to brown. They will not provide the flavor you need for your banana pudding. As mentioned in the recipe, look for yellow bananas that still are slightly green on the stem. They should not have any brown spots. These bananas will be barely ripe and are less likely to brown immediately.
If you’re overly concerned about the appearance of your banana pudding, make it early on the day you plan to serve it. It truly looks best on the day made.

You May Also Like
- Cinnamon Topped Banana Bread
- Sour Cream Banana Cake
- Bananas Foster
- Banana Cream Cheesecake Pie
- More of my Best Dessert Recipes

Southern Banana Pudding Recipe
A classic Southern dessert recipe that's a breeze to prepare!
Ingredients
- 1 can (14 ounces)sweetened condensed milk
- 1 ½ cups ice water (remove ice before measuring)
- 1 small box (3.4 ounces) instant vanilla pudding mix
- 3 cups heavy cream
- 4 bananas, yellow but not spotted, and slightly green at the stem end
- 1 bottle or can of lemon lime soda, like Sprite or 7-up, optional
- 1 12-ounce box of Nilla Vanilla Wafers
Instructions
- In a large mixing bowl, beat sweetened condensed milk and ice water until well combined. Add the pudding mix and beat for about 2 minutes. Cover bowl with plastic wrap and refrigerate until set, 3 hours or longer.
- When the pudding mixture is set, whip the heavy cream to stiff peaks. Fold the whipped cream into the pudding mixture until well combined.
- Slice the bananas into a bowl. Add the can of soda and let soak briefly while starting to layer the dessert.*
- Layer about a third of the vanilla wafers on the bottom of a large (4 qt) glass bowl or another large serving dish.
- Gently drain the bananas and place them on paper towels to absorb the excess liquid.
- Top the vanilla wafers with a third of the bananas then a third of the pudding mixture. Smooth the pudding with an offset spatula to level.
- Repeat the layers two more times.
- Crumble some of the remaining vanilla wafers to make crumbs. Sprinkle the crumbs over the top of the pudding.
- Chill for about 4 hours before serving.
Notes
Adapted from Magnolia Bakery's Cookbook.
Make banana pudding parfaits by layering the 3 components into clear glasses or parfait dishes.
*Soaking the bananas in lemon-lime soda will help minimize browning. It's optional, but your bananas will brown by Day 2.
Recommended Products
As an Amazon Associate and member of other affiliate programs, I earn from qualifying purchases.

Nutrition Information:
Yield:
16Serving Size:
1Amount Per Serving: Calories: 338Total Fat: 20gSaturated Fat: 12gTrans Fat: 1gUnsaturated Fat: 7gCholesterol: 51mgSodium: 200mgCarbohydrates: 39gFiber: 1gSugar: 27gProtein: 3g
Thatskinnychickcanbake.com occasionally offers nutritional information for recipes contained on this site. This information is provided as a courtesy and is an estimate only. This information comes from online calculators. Although thatskinnychickcanbake.com attempts to provide accurate nutritional information, these figures are only estimates. Varying factors such as product types or brands purchased can change the nutritional information in any given recipe. Also, many recipes on thatskinnychickcanbake.com recommend toppings, which may or may not be listed as optional and nutritional information for these added toppings is not listed. Other factors may change the nutritional information such as when the salt amount is listed “to taste,” it is not calculated into the recipe as the amount will vary. Also, different online calculators can provide different results. To obtain the most accurate representation of the nutritional information in any given recipe, you should calculate the nutritional information with the actual ingredients used in your recipe. You are solely responsible for ensuring that any nutritional information obtained is accurate.


27 Comments on “Homemade Banana Pudding”
Everyone at my house was really impressed with this dessert! Seriously amazing!
Wow this sounds great Liz. This is one of those desserts I love but can’t even recall the last time I made it. Seems that is a sign right? Plus I’ve never had it with meringue so this is new to me…sounds delish!
This looks amazing. I am about to make this and noticed the temptation to cook the meringue is not there. Can I get it?
Hi, Brittney, the temp is 400 degrees. I’ll edit the recipe!
I’ve never made banana pudding before and not sure why! It’s such Southern staple and I love it whenever I have it. Can’t wait to give it a go with this beautiful recipe!
First I can’t believe that the Kitchen Lioness (Andrea) has not tasted this banana pudding before. Her girls will LOVE it and I am sure she will put her own dash to it, making it more special. I have had it before, of course, but not as well done as you describe. Makes me want to go back and try again.
My sons favorite dessert and I never tried it with the meringue a must do! Thanks Liz
Oh Liz, my husband will love this dessert…pudding and banana…thanks for the recipe…simple and yet delicious!
I hope you are enjoying your week!
Oh, mercy! This would be gone in a flash here! Bill loves banana pudding and this is a great recipe for it. Just need to get the bananas and milk. Thanks for sharing, Liz and keep warm! Colder weather and snow on its way here again, so this is a perfect comfort dessert!
Oooh love the meringue on this pudding! It all looks amazing
Oh I am all about the comfort food this week and this banana pudding would sure hit the spot!
Dear Liz, I do not believe that I have ever made a Banana Pudding, vanilla, of course, and chocolate too but never banana, but it does sound delicous and it does look very pretty too!
So many good and helpful tips and notes too!
Thank you for sharing a great recipe, my friend!
I can’t remember the last time I had banana pudding! And I don’t think I’ve ever made it. Time to rectify that! Your recipe looks great. Thanks!
This sounds so good, and I really appreciate all the tips to make this dish a success in my kitchen too. Honestly, I’ve never heard of banana extract! I’m curious now about it. I think I prefer the simplicity of vanilla pudding too, but I’m curious now :-).
My father’s favorite dessert! Truth be told, I’ve never had it! He only ate it from the diner and we always ordered sundaes! I kind of want to try it now, so I better get started!
Banana Pudding was definitely one of my favorite homemade desserts growing up in the big city. 🙂
Well I have just found out that I have been cheated my whole life when it comes to banana pudding. I’ve never had it topped with meringue…yes on banana cream pie but never once on pudding. Thank you for enlightening me. 😀
I love that you made these as individual desserts instead of pie – no crust to bother with. Brilliant!!
What a perfect comfort food dessert! It sounds delicious. Thanks for joining me!
Oh I am a big fan of banana pudding pie, love the idea of making it without the pie crust. Yes pudding on the stove demands all your attention, but so worth it. Got to try soon!
I’ve never made banana pudding – when I do, it will surely be this one. My beloved is a huge fan of bananas, hmmm. Guess I know what I’ll make him next time I want to do a fun dessert.
I want some and I want it now 🙂
Amalia
xo
Dear Lizzy the other day I was looking by a banana pudding .but many recipes called by pudding in boxes !
I try to make all except some difficult dough ! So I print your recipe for the next time I have bananas ! hugs and love!
thanks by the recipe looks delicious
I’ve never had banana pudding or pie! I need to fix that
Hi Liz…Banana is one of my favorite fruit and this pudding looks soo yummy & more delicious….i will definitely make this pudding…Thanks for sharing…!
Hummm… And I was just thinking I haven’t made anything with bananas recently… This looks great:@)
Wow, I’ve yet to try banana pudding! xoxo