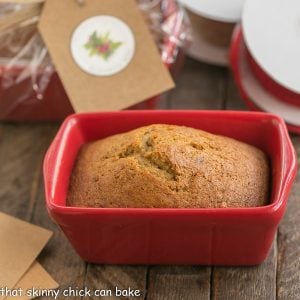
Mini Pumpkin Breads
Mini pumpkin breads are the best food holiday gifts. This easy quick bread recipe will make your kitchen smell amazing!
I have a group of marvelous friends in my book club. Each December, we exchange gifts. As you might imagine, my contribution is something homemade from my kitchen. This year, I baked mini pumpkin loaves using my family’s favorite recipe. These Small Loaves of Bread made ideal gifts.

Why You Must Maketab
- Dense, moist, and full of warm spices, this recipe is for a truly classic pumpkin bread. No chocolate chips or streusel needed (though I’ve shared those loaves, too). It’s wonderful just as it is!
- This is the same pumpkin bread that one of our neighbors would bring over every Christmas. We’d slather slices with butter and half the loaf would disappear in minutes.
- I’ve been making this same recipe for decades! If you don’t have a tried and true pumpkin bread recipe, make sure to pin this winner!
Ingredient Notes
- Kitchen Staples – Sugar, Vegetable Oil (like Canola), Flour, Water, Salt, Baking Soda
- Eggs – Have them at room temperature for easier incorporation. All my recipes use large eggs unless otherwise noted.
- Pumpkin – Pure pumpkin puree, not pumpkin pie filling which has spices, etc. added to it. You will not need the whole can, just 1 cup.
- Baking Powder – This recipe uses both baking powder and baking soda. Note that baking soda has a long shelf life. Baking powder almost always expires before you can use the whole tin. So make sure to check the date before you start making the batter. You can always test it by putting a spoonful into a cup of hot water. If it’s still fresh, it will bubble vigorously.
- Cloves, Allspice, Cinnamon – Note that spices can lose some of their flavor if they’ve been in your pantry for a number of years. Consider replacing any that have been around for years.

How to Package Holiday Breads for Gifting
My blogger friend, Julie, shared her Sweet Orange Bread in small, inexpensive ceramic dishes from Michael’s (link in recipe). Hers were solid white, but since it’s November, most I spotted were covered with holiday designs. Preferring the plainest version available, I picked up a dozen in red, plus one white one with a Santa belt, the least obnoxious of the holiday designs. I will try to stock up on the white dishes in the off-season. A little food-safe cellophane wrap, ribbon, and a gift tag make each one a festive, not to mention, a delicious treat! I love splurging on these Felix Doolittle Chef Medallions to affix to my gift tags.
Recipe Tips
Quick bread and muffins are super easy to make, but there are a few tips you should know before you start mixing.
- Make sure to prep your pans well so the whole loaf comes out without sticking. I like using a flour-oil spray like Baker’s Joy, plus putting a greased rectangle of parchment on the bottom of each pan.
- Let the bread cool for 10-15 minutes before removing them from the pans and to a cooling rack. Any longer and the bread can stick. For gifting, I then wash out the pan and add the loaf back when it is cool.
- PRO-Tip: Have your eggs and any refrigerated ingredients at room temperature before mixing. They will incorporate more easily if not cold.
- If you forget, add your eggs to a bowl of hot (not boiling, you don’t want to cook the eggs) water while you get the other ingredients ready. That will help take the chill off.
- PRO-Tip: Do not over mix or your bread can develop tunnels. If using a mixer, recommend the paddle attachment at a lower speed. Or just mix with a wooden spoon.
- After adding the dry ingredients, mix until they’re just incorporated. Give the bottom a good scrape with a rubber spatula to make sure the batter doesn’t have any flour pockets, then add to the pans.
- PRO-Tip: Don’t overfill your pans. About ⅔ of the way up the sides is perfect. Note that there are many different sizes of mini loaf pans, so start checking to see if your bread is done early. Once you find the perfect baking time for your pans, make a note of it on the recipe for future batches.
- Start checking your bread about 5 minutes before the timer goes off. Or when you start to smell the delicious aroma of a baked loaf. All ovens bake differently, and you don’t want to overbake. Use a toothpick inserted in a few spots across the middle. If it comes out clean, the bread is done.

Frequently Asked Questions
If you can be 100% sure the consistency is exactly like canned pumpkin puree, it should work. But most often it’s more watery than the canned version and the loaves won’t bake up properly due to the extra liquid. I’d advise against it unless you’re willing to experiment with a batch.
Sure, both would be delicious options. Try 1-1½ cups of either nuts or chocolate chips stirred into the batter right before adding it to the pans.
Unfortunately, once the batter is mixed the baking soda and baking powder are activated. Therefore, the loaves won’t rise properly when they’re placed in the oven. It’s best to make the batter, add to the pans, and bake as soon as possible.
You May Also Like:
I love giving food gifts during the holidays. From quick bread to cookies to candy to homemade liqueurs, there are so many alternatives when it comes to homemade holiday food gifts!
Make sure to check out my Food Gifts Pinterest Board for loads of ideas for holiday gifting!
- Pumpkin Bread with Apples
- Cinnamon Crusted Pumpkin Bread
- Classic Banana Walnut Bread,
- Zucchini Bread
- Sour Cream Pear Bread
- Chocolate Chip Toffee Banana Bread
- Cranberry Orange Walnut Bread
- Southern Peach Bread
- More Bread Recipes
- More Food Gift Recipes
Mini Pumpkin Bread
A classic pumpkin bread recipe that's always a hit. Make mini loaves for hostess or holiday gifts!
Ingredients
- 1 ½ cup sugar
- ½ cup oil
- 2 eggs
- 1 cup pumpkin
- 1 ¾ cups flour
- ¼ teaspoon baking powder
- 1 teaspoon salt
- 1 teaspoon baking soda
- ¼ teaspoon cloves
- ¼ teaspoon allspice
- ½ teaspoon cinnamon
- ⅓ cup water
Instructions
- Preheat oven to 350º. Grease pans.
- Combine sugar and oil. Add the rest of the ingredients in order.
- First whisk in the eggs, then the pumpkin.
- In another bowl, whisk together the flour, baking powder, salt, baking soda, and spices, then add them to the pumpkin mixture and mix just until combined. Do not over-mix.
- Stir in the water, then divide the batter between pans.
- Bake for 35-40 minutes for small loaves. If you're using a full-size loaf pan, start checking at about 60 minutes, but my heavy-duty loaf pans usually take more like 75 minutes.
- Check the center of the loaf with a toothpick. It should come out clean after inserting when the loaf is done.
Notes
My mini ceramic pans measure 5 x 3 x 2 inches. You can often find them at Michaels.
I haven't tested these mini loaves with the addition of chocolate chips, but you can start with 1 cup, mix in and add up to another ½ cup if desired.
Nutrition Information:
Yield:
10Serving Size:
1Amount Per Serving: Calories: 315Total Fat: 12gSaturated Fat: 1gTrans Fat: 0gUnsaturated Fat: 11gCholesterol: 37mgSodium: 365mgCarbohydrates: 48gFiber: 1gSugar: 31gProtein: 4g


48 Comments on “Mini Pumpkin Breads”
I love the idea of having little mini pumpkin breads
I’m looking to make this for my kids’ teachers, so I’ll be making several! Can this recipe be doubled or tripled? Thanks so much!
Hi, Lisa! Yes, I often triple it to give each of my 3 kids one large loaf. What a nice treat for the teachers!!
I was looking for a recipe to use up my one cup of homemade pumpkin purée so decided to give this a try. Most recipes call for more. I was concerned it wouldn’t be a strong enough pumpkin flavor but it was so moist and flavorful, I am saving it for future repeats when I have more purée from fresh pumpkins. I was afraid the cup and a half of sugar would be too much but it was fine. I used 3/4 whole wheat flour and 1 cup ap flour. Definitely a keeper.
So glad you enjoyed!! I’ve been eating this same pumpkin bread recipe for decades!
Loved this! Made 3 batches to give away to friends on a special thanksgiving delivery! Mine, though, yielded 4 minis per recipe! I have received great reviews!
I’m so glad, Mindy! What a nice Thanksgiving gift. My grown kids adore this recipe, too. Thanks for letting me know and enjoy the holiday!!!
These are so fun for holiday gifting! I love giving and getting homemade food gifts!
I love making mini loaves over the holidays. They are the perfect gift for sharing with friends and family. I know these will be loved by all.
Made the darling pumpkin loaves1 These are easy to mix and bake, Thank you so very much for this, is AWESOME!
Taste delicious.
Have one question, are there any gift tags to print?
I wish I was crafty enough to create some gift tags for my readers. I bought the medallion stickers from a company called Felix Doolittle. Enjoy your holidays!!
How many small loaves does one recipe make? And..is it possible to add nuts or raisins into the bread!
I am a disabled man who gets quite bored..have taken up baking as a hobby. I find it most fulfilling and I can bake when I feel like it. I have become my Doctors favorite because I always arrive with baked goods in hand. This recipe is one I have been searching for. Thank you for posting it! And for sharing it with us all@!
Hi, Scott,
This recipe makes 5 mini loaves. It won’t use a whole can of pumpkin, just a cup (I had this question recently, too :)). I’m sure your doctor and staff just love you! Happy baking!
Can these be frozen and then placed in tin holiday pans for sharing?
Hi, Kathy! Definitely. These freeze well!
What size can of pumpkin? Help!!
Hi, Karen,
Use the smaller 15 ounce can of pumpkin, but you’ll only need one cup of it. The can holds just less than 2 cups. Enjoy!
Oh great, I see now it says cup. I thought it said can…..lol, thanks
Your presents look so pretty, Liz…love the little pans. So cute! You are beyond talented, my friend.
Mmm. Your pumpkin bread is a keeper =) Thank you!
I’m a little confused about the baking time. Is it 35 to 40 minutes for the mini pans and 75 minutes for the full size loaf?
Hi, Rosemary,
Yes, you’re exactly right. Sorry for the confusion. I’ve edited the recipe to try to make the baking times a little clearer. Thanks!!!
That baking dish is so cute! Great gift giving idea.
I love anything pumpkin and this bread looks delicious and that baking dish is adorable!
What beautiful homemade gifts, Liz! I love the santa loaf pan and those stickers really add a classy touch! Who wouldn’t want to be given one of these beauties? Just lovely!
I LOVE These! Such unbelievably great gifts!
homemade food gifts are always such a hit! and I just love that pan
How cute is that packaging??? Love this festive treat.
I would be so delighted to receive such a delicious gift!
Adorable breads, Liz! And the perfect size for sharing (and enjoying!) 🙂
I love using pumpkin in my cooking but yet to explore that in baking 🙂
I love quick breads like this. The pumpkin bread sounds yummy! I love the mini loaf pans, so cute.
These look delicious Liz, love the cute baking pans. Take care!
Thanks for the shout-out Liz! The photos and the food look delicious! At Felix Doolittle, we do things like great bakers do: We make (just about) everything fresh to order and take the time with the details (in our case, hand-cutting each medallion one by one so that they are perfectly aligned) and using great quality ingredients (otherwise known as paper)!
Wishing you a very happy holiday baking season! 😀
You can’t go wrong with a holiday bread. The baking dishes are such a nice touch! I wish I lived closer to you, I would adore this gift but it wouldn’t last long in our house.
These mini pumpkin bread loaves look incredible and the Santa loaf pan is even more amazing !
These look fabulous, Liz. I too am in a book group and my book group friends always get a homemade gift from my kitchen. This year they’re each getting a bag of Cherry Almond Scone Mix!
These look so cute! What a lovely idea for a homemade gift.
I was just thinking about making some type of bread for my neighbors so this will be perfect!
These are so cute! The loaf tins are wonderful!
love
I love to give quick breads too and fudge or cookies. I can add this recipe to my list!
There are few things as tasty as excellent pumpkin bread. When I think back among some of the best baked goods I have had, either from bakeries or my own kitchen, pumpkin bread springs to mind. It is just so comforting.
I often make and give mini breads at the holidays. I love your Santa pans!
That Santa belt dish is adorable, and I’m sure the pumpkin bread is just as good! A lovely gift.
I LOVE pumpkin bread. These are super cute and I love those little pans. Where on earth did you get those?
Christie, you can find them at Michael’s both in the stores and online.
My first thought was ‘I love the little Santa belt dish’-cute! I’m sure everyone enjoyed their goodie:@)
They make such a lovely holiday gift, Liz. Lovely bread and cute baking pans!